How one can set up a exhausting pressure for your computer
How one can fabricate a PC
Form no longer be petrified of cracking commence your desktop PC’s case. Installing a new exhausting pressure is a total process somebody can worth.
Marco Chiappetta/IDG
At this time time’s Excellent Tech Deals
Picked by PCWorld’s Editors
Top Deals On Expansive Products
Picked by Techconnect’s Editors
Installing an inner exhausting pressure is one of the extra straightforward upgrades available—and is most frequently the next risk than utilizing external drives that could well be dropped or misplaced.
The technique most frequently requires no extra than mounting it, connecting about a cables, and formatting the pressure to be used. Serene, there are about a property you also can serene know to invent installation as mushy as doubtless.
Installing a exhausting pressure for your PC doesn’t essentially discover the same process as inserting in an SSD. In case you’ve opted for a solid-pronounce pressure, invent particular to set up out our companion guides explaining set up an SSD in a desktop and a computer pc. SSDs are liable to supply mighty faster speeds than exhausting drives, however exhausting drives provide tremendously extra potential at decrease prices.
Sooner than we dive into the nitty-gritty vital facets, whenever you occur to’re shopping for a exhausting pressure to set up for your computer, these are some extremely regarded alternatives. All three trip at 7,200 revolutions per minute (RPM), the fastest perambulate obtainable in user exhausting drives.
- Seagate BarraCuda: 2TB for $55, 4TB for $90, 8TB for $140, extra sizes obtainable.
- Toshiba X300: 4TB for $95, extra sizes obtainable
- WD Dim: 1TB for $70, 2TB for $100, 8TB for $250, extra sizes obtainable.
Now let’s get this exhausting pressure set in for your computer.
Power cages, bays, and mounting alternatives
Internal 3.5-tear exhausting disk drives are most frequently mounted in a pressure cage or in an obtainable pressure bay. Placement and orientation of the cages or bays will fluctuate from case to case. The most well-liked enviornment is at the decrease front, shut to the consumption fans and away from diversified ingredients. Power cages/bays will most frequently be mounted perpendicular to the bottom of the chassis, while drives mounted in the cages most frequently sit parallel to the bottom of the case.
 Marco Chiappetta
Screws are the actual manner to rating your exhausting pressure into your case’s pressure cage. Magnet-tipped screw drivers can support withhold you from shedding screws in annoying-to-reach locations.
In mainstream conditions, pressure connectors will most frequently indicate the rear. In enthusiast-class conditions, it’s changing into extra total to seek out the pressure’s connectors going via the lovely aspect, making it more straightforward to route and screen cables in the attend of the motherboard tray. Some enthusiast-class also conditions give customers the power to pick out pressure cages or to mount them in diversified positions to optimize air hump with the wander and simplify cable management.
Mounting your exhausting pressure
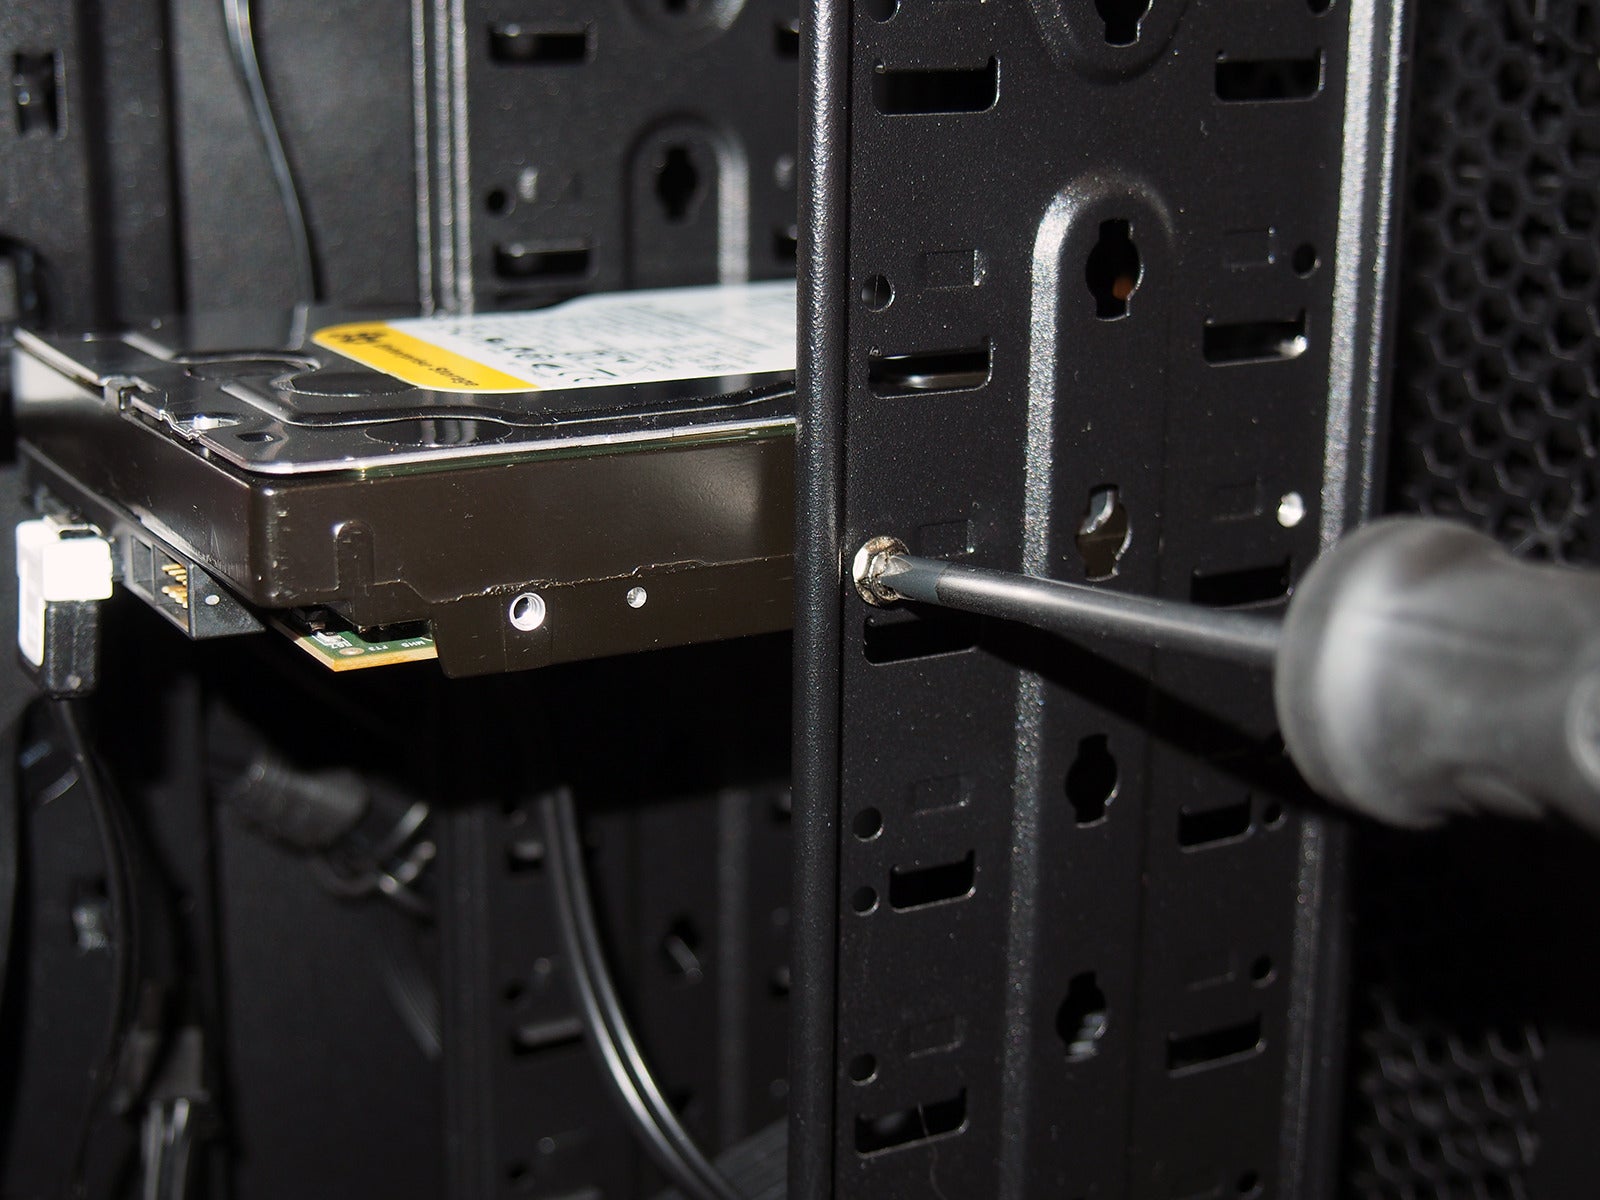
Physically mounting the exhausting pressure in a PC also can very wisely be presumably the most annoying fragment of the installation process.
Securing the pressure to a cage most frequently requires four screws on the perimeters or bottom of the pressure. Many conditions—severely enthusiast conditions—converse instrument-less trays that retain the drives with straightforward pins and clips.
Some conditions comprise instrument-less brackets that invent mounting exhausting drives very easy. On the other hand, these brackets are now and again less rating than used screws.
The converse of screws is the extra sturdy mounting manner, however instrument-less trays are aesthetic for systems that won’t be moved around mighty.
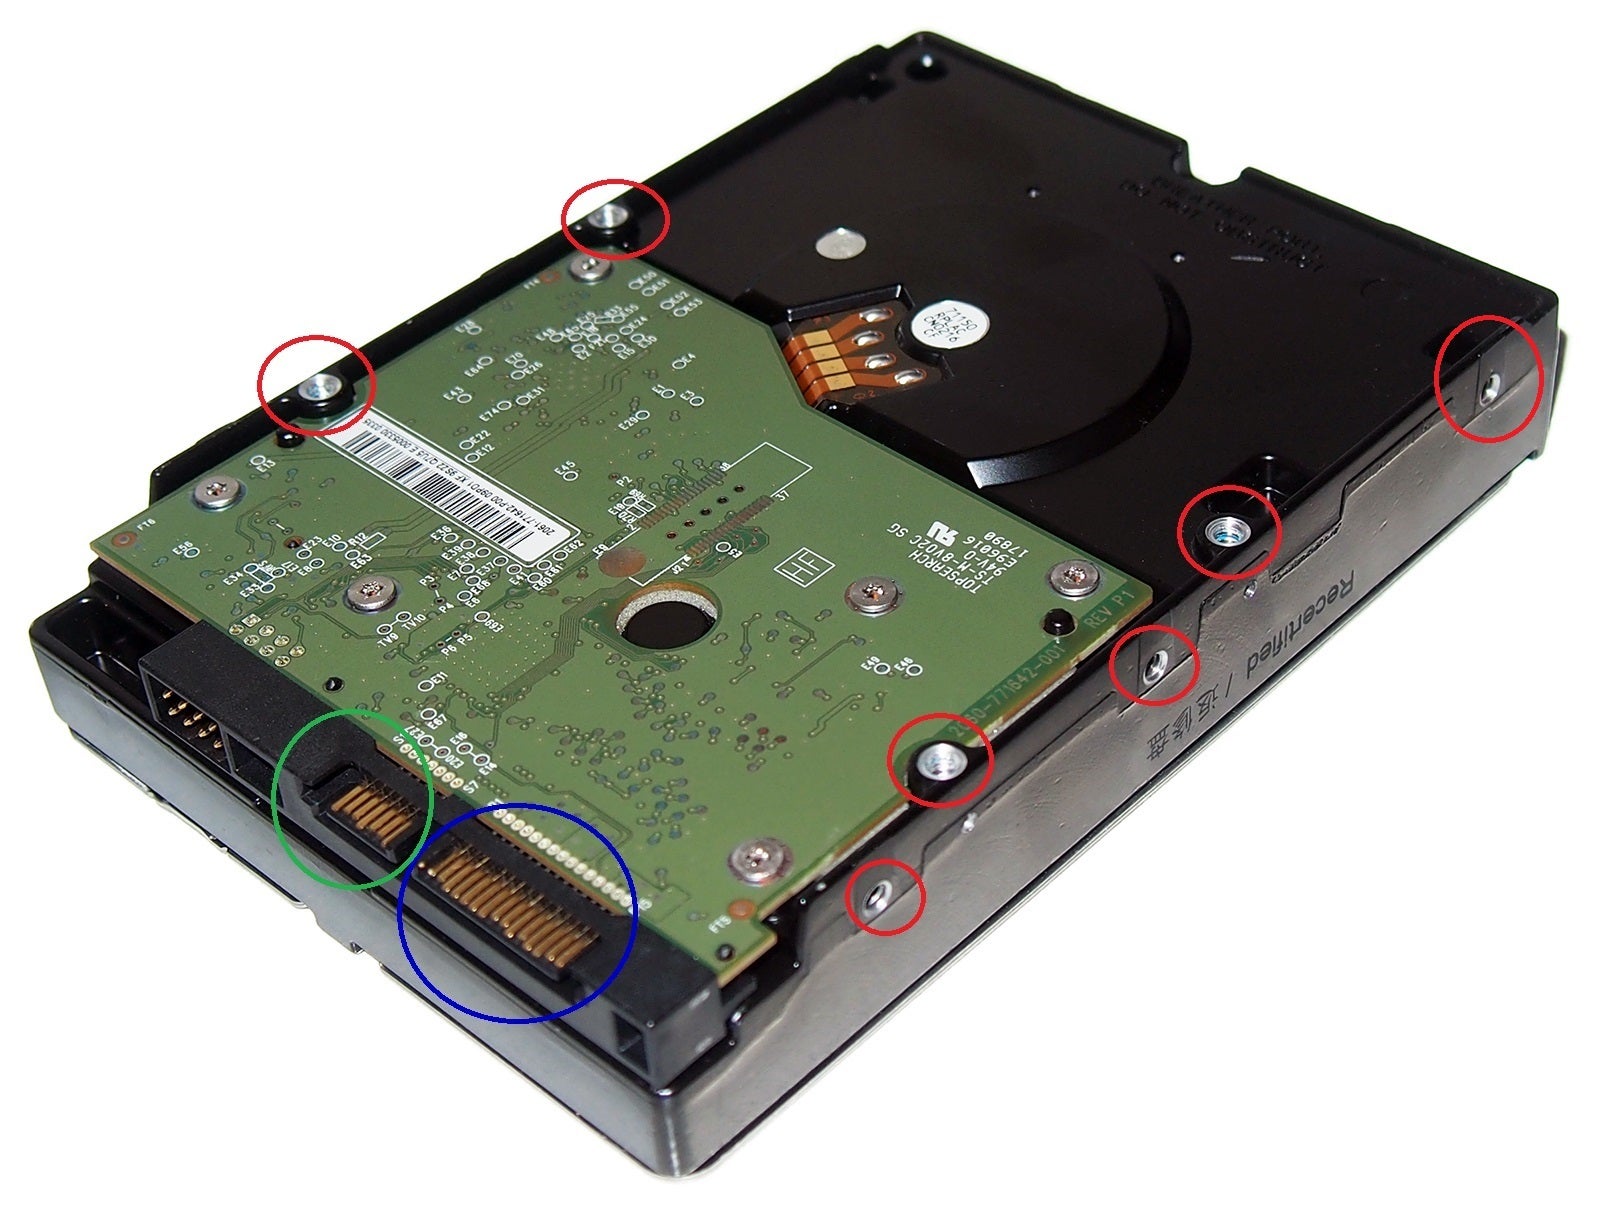
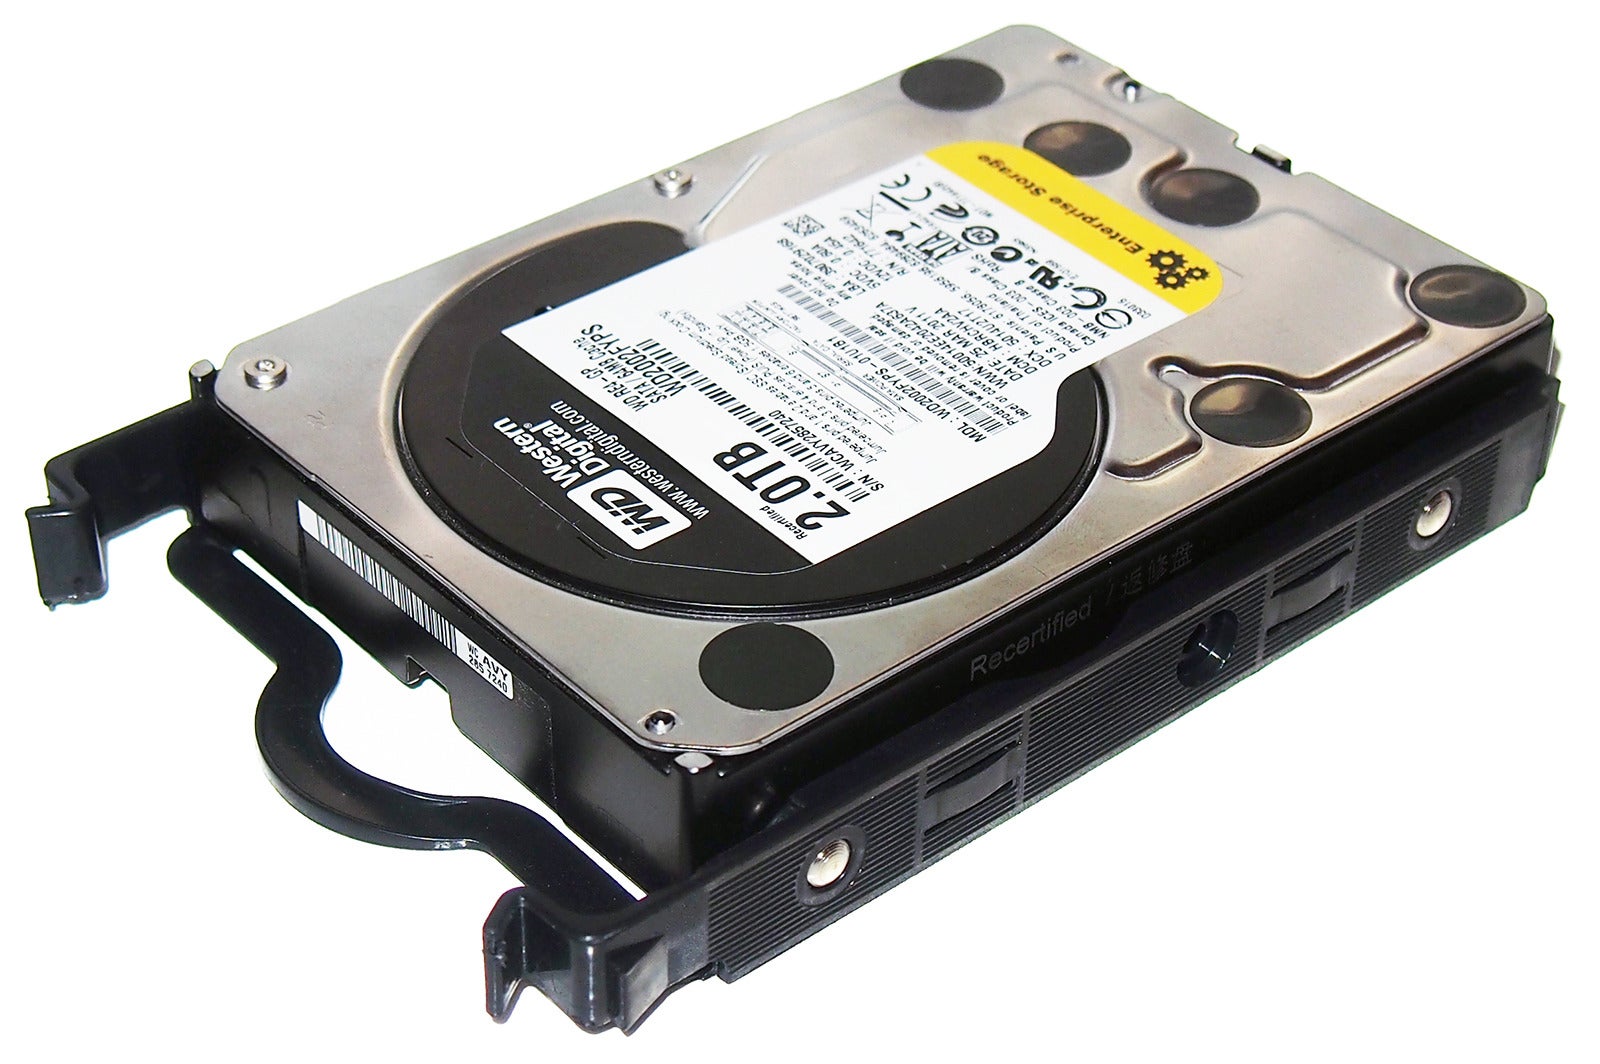
This exhausting pressure is flipped upside-down to prove its aspects. Seven of the 10 screw holes are circled in crimson, while SATA energy and files connections are circled in blue and inexperienced, respectively.
Drives closing longer when they retain nice and wintry. When mounting drives in a system, strive to leave as mighty condo between them as doubtless to maximize airflow over the tops and bottoms. Positioning the drives straight in front of an consumption fan also helps.
Join the exhausting drives with SATA
As soon as the pressure is mounted, connecting it to your system is immediate and simple.
Nearly all new desktop exhausting drives sold this day converse the SATA interface (until you’re going via servers). SATA uses straightforward cables that are keyed to suit on the pressure and motherboard connector one manner.
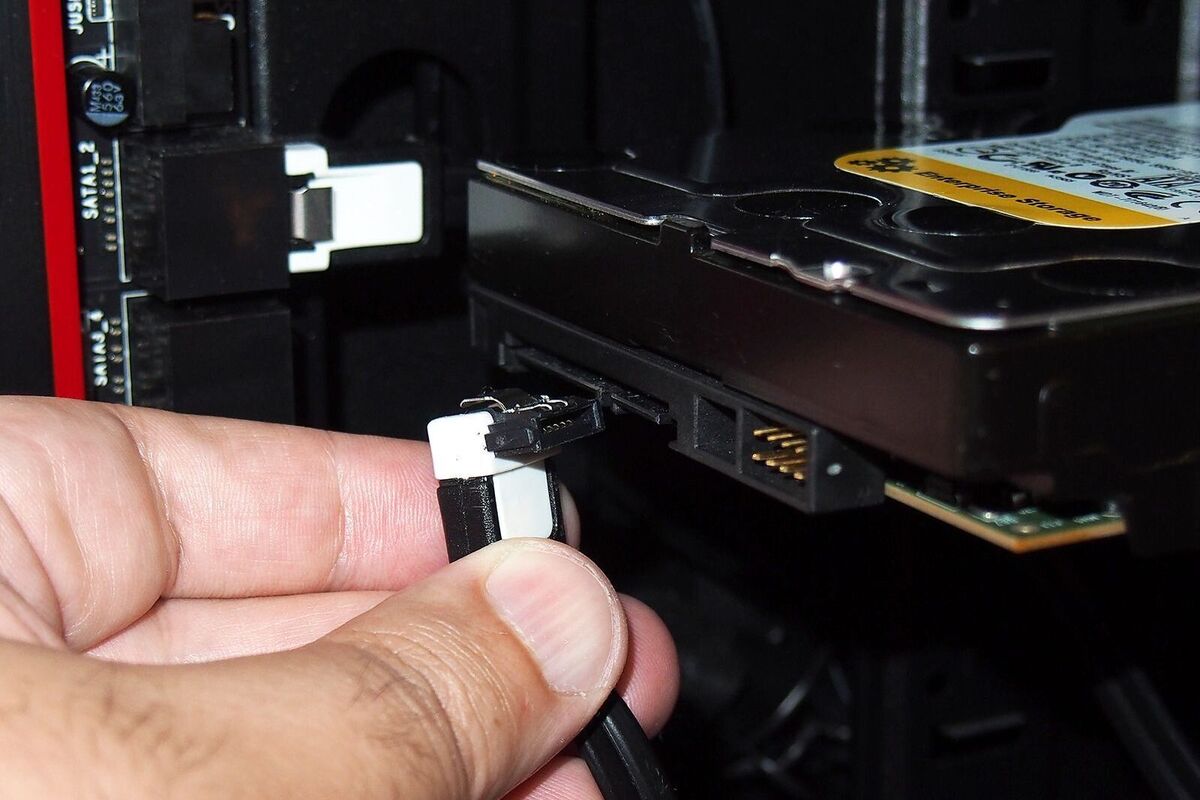
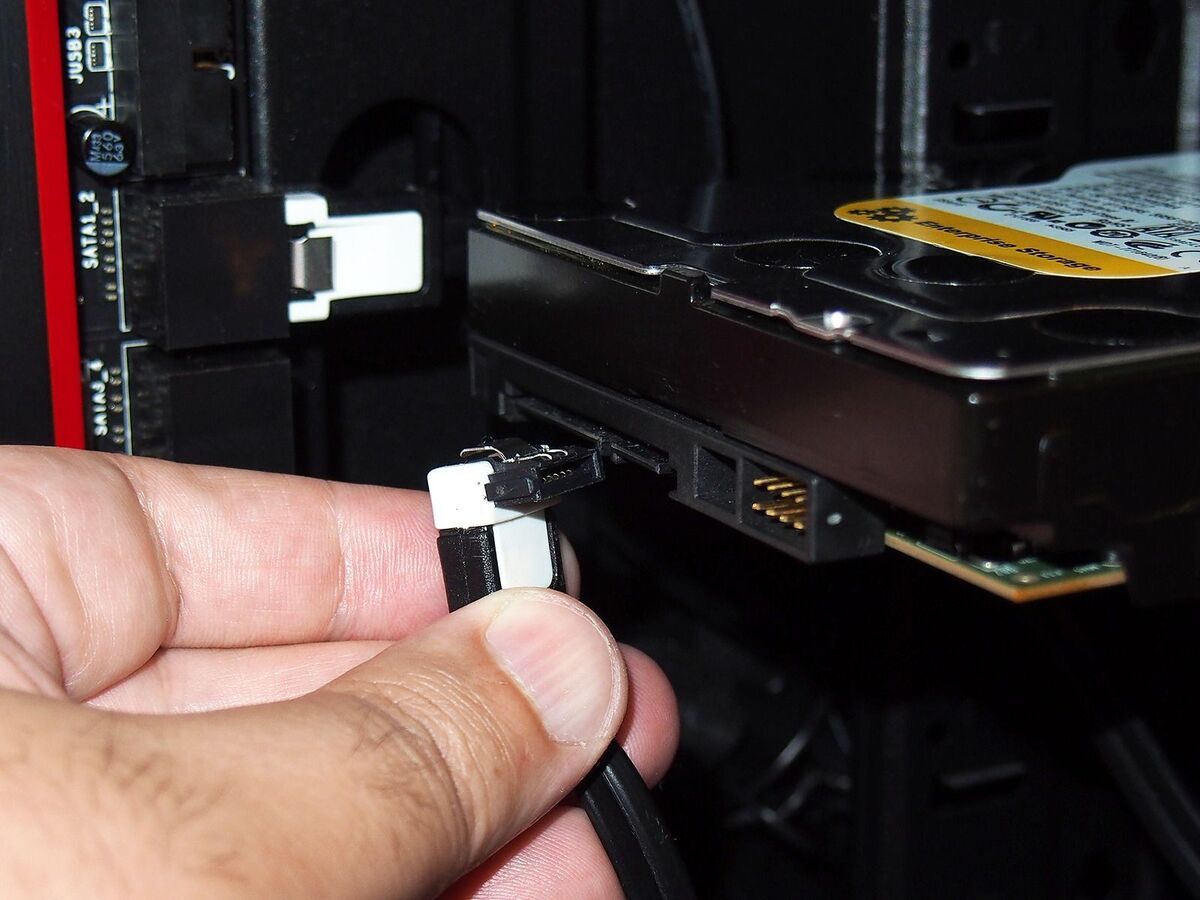
Join one stop of the SATA cable to the pressure, and the diversified stop to an obtainable SATA port for your motherboard, and you’re midway there.
 Marco Chiappetta
Some SATA files cables comprise L-fashioned ends, that also can support withhold cables tremendous.
Which that you just would be in a position to well also get the SATA cables integrated with your new pressure or motherboard feature diversified connectors: straight ends or lovely-attitude (L-fashioned). Some also can beget metal retention clips, while others attain no longer. The form of the connector makes no distinction in efficiency.
I recall to converse SATA cables with lovely-attitude connectors on the pressure aspect, offered there is ample clearance between any drives in the system. The converse of beautiful-attitude connectors on the motherboard aspect will will result in blocked ports, for the reason that connector also can overlap adjoining ports.
Try to seek out SATA cables with metal retention clips, because they support withhold the connectors secured. Most SATA 3 (6-gigabit)-compliant cables will most frequently comprise the clips.
 Marco Chiappetta
The SATA energy cable connection looks to be akin to the guidelines cable, however is longer. The connector is keyed to suit entirely one manner.
In case you’re accomplished connecting the SATA cable, you’ll beget to join the pressure to your energy supply unit (PSU). The SATA energy cable out of your PSU, adore the SATA files cable, is keyed to suit onto the pressure one-manner. So long as you don’t pressure it, there’s in actuality no manner to mess it up.
Prepare the exhausting pressure to be used
While you’ve mounted and linked the pressure, energy up your system and enter the BIOS/UEFI. Which that you just would be in a position to well most frequently access the BIOS/UEFI by pressing the DEL or F2 keys lovely after powering up the system. Typically, your system will indicate a message alongside the lines of “Press DEL to enter Setup.” Search the recommendation of your motherboard’s handbook for the actual key.
Within the BIOS, hump to the traditional Machine Settings menu or the Integrated Peripherals > SATA menu to seek out all the drives set in in the system. If all of your pressure controllers are enabled and the pressure is effectively linked (and helpful), it could well also serene be listed in the BIOS.
If the pressure isn’t listed, shut down your PC. Double-test all the connections, boot into the BIOS and test again. If the pressure serene isn’t exhibiting up and all the connections are rating, strive plugging the SATA files cable actual into a clear port on the motherboard.
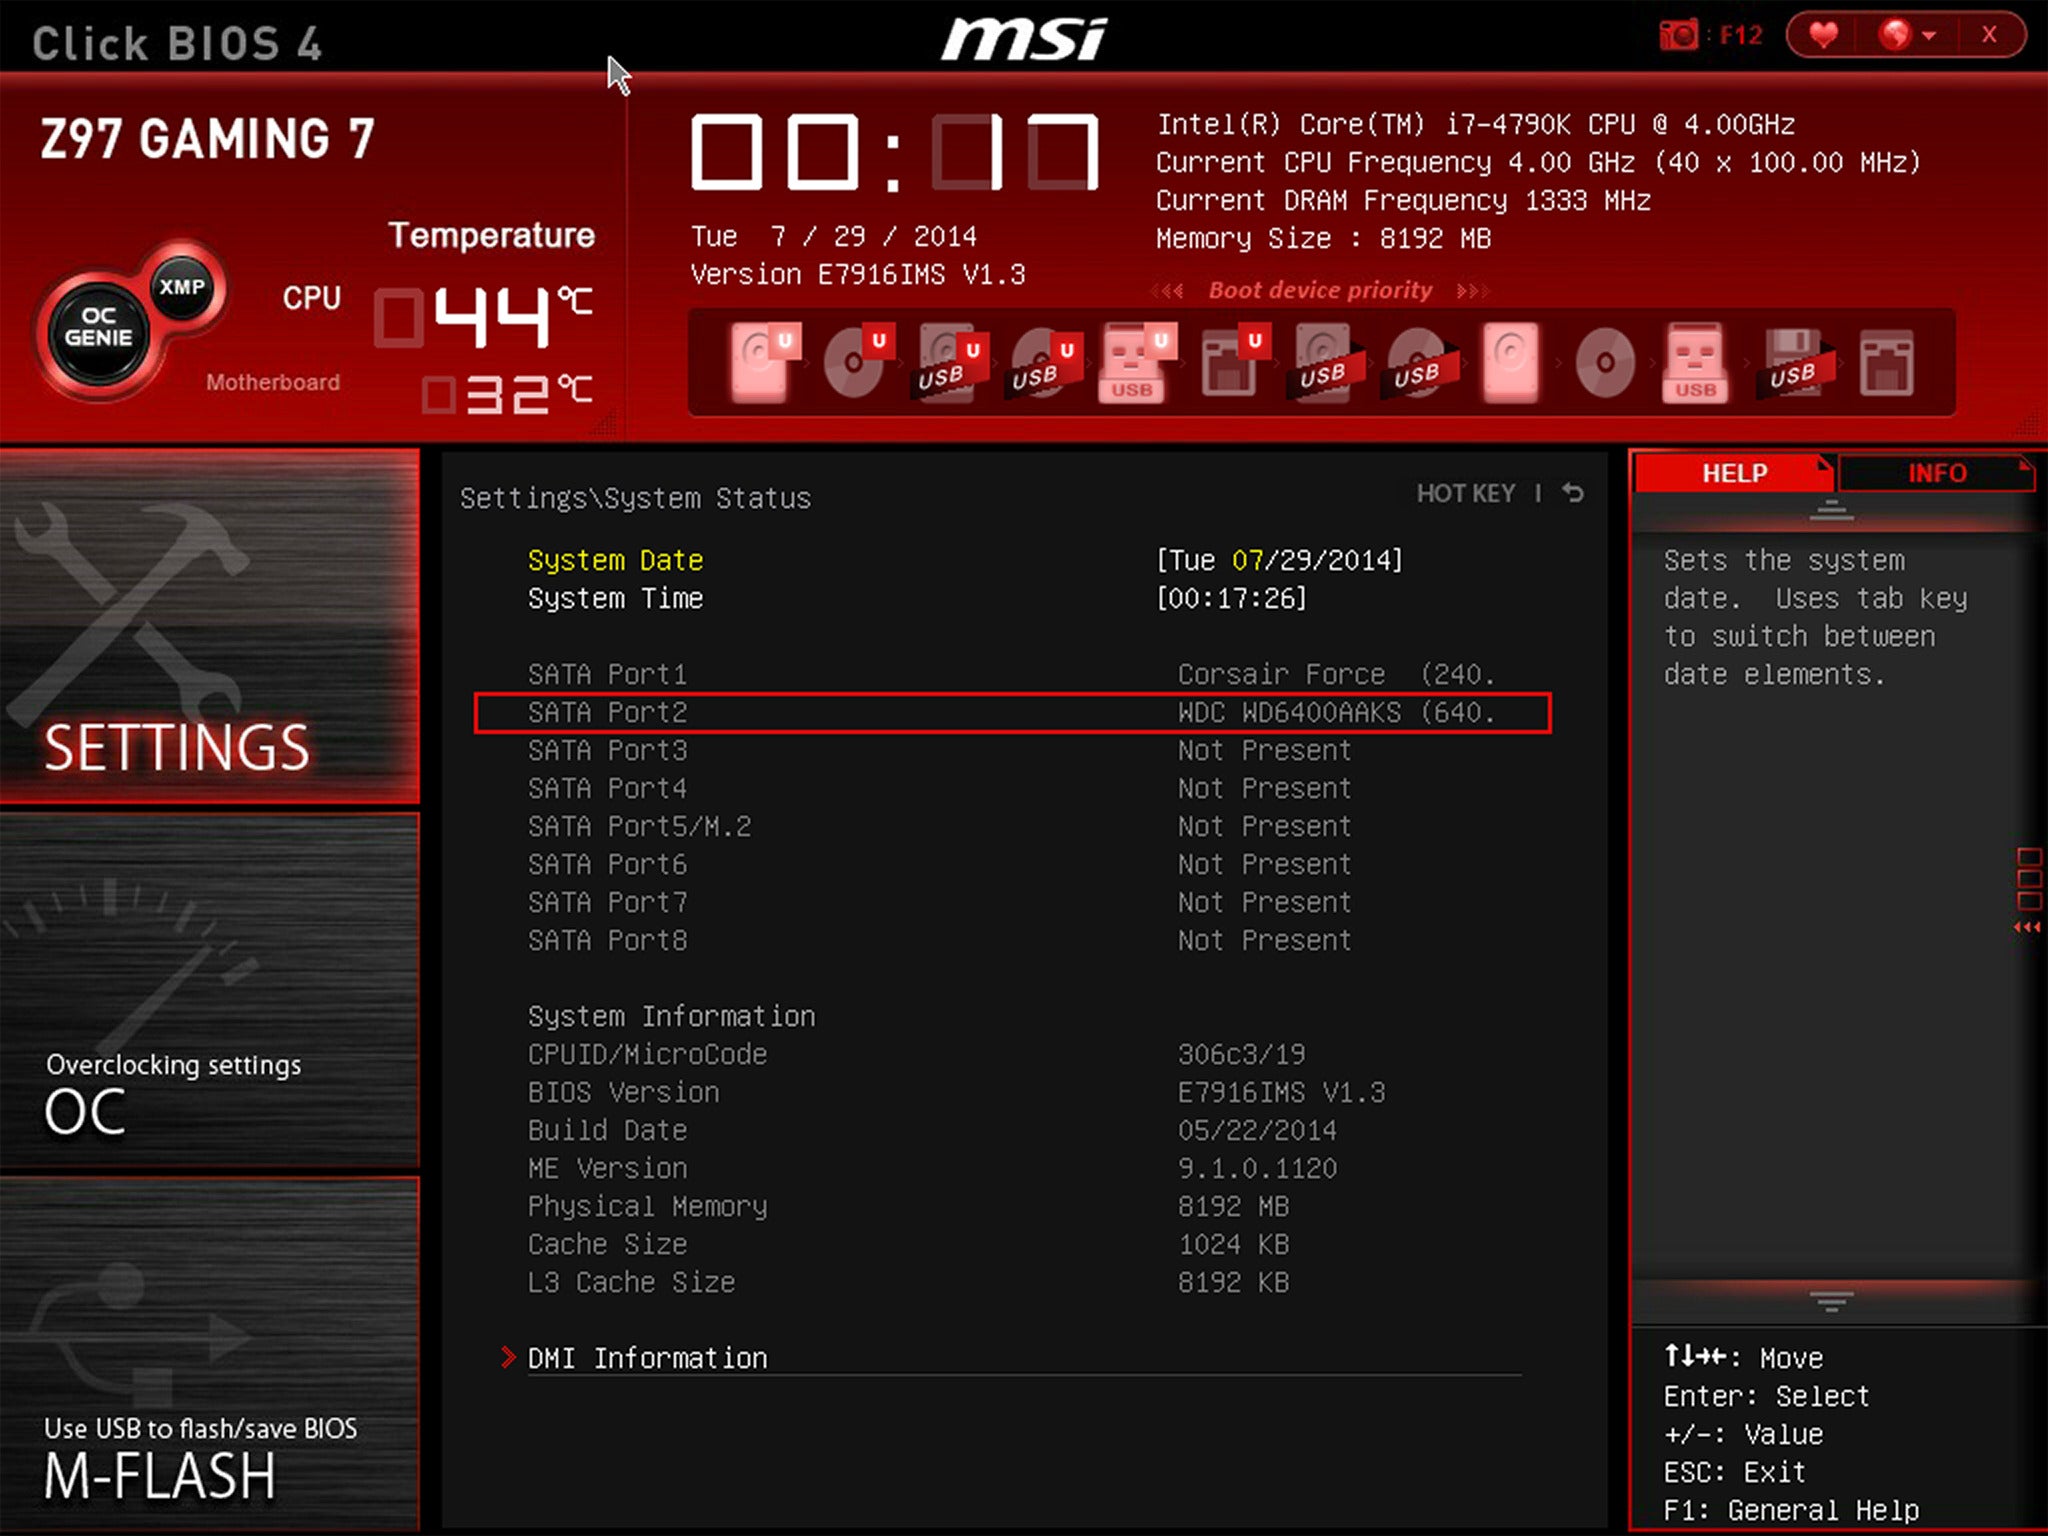
The UEFI BIOS will prove all exhausting drives that are linked wisely and detected by the system. BIOS and UEFI interfaces can fluctuate based mostly totally on the motherboard invent and model, so test your motherboard handbook or producer internet page for vital facets.
To ascertain that Windows acknowledges the pressure, commence up Tool Supervisor. In Windows 10, lovely-click the Windows button for your desktop and fetch Tool Supervisor. Test for the pressure in the Disk Drives piece.
In case you boot into Windows after inserting in the pressure, you also can detect the Unusual Hardware Stumbled on wizard pop up if the pressure is detected. The closing thing you beget to attain is partition and layout the pressure.
And with that, the pressure also can serene be obtainable to be used. In case you split the pressure up into a entire lot of partitions, you also can serene detect several drives appear in File Explorer, each with its possess pressure letter and worth.
Sing: In case you bewitch something after clicking hyperlinks in our articles, we also can develop a small charge. Read our affiliate hyperlink coverage for additional vital facets.