Mortal Shell Boss Data: How To Beat The Toughest Foes In Fallgrim
Mortal Shell is all about tricky duels with lethal foes who can lay you low with most attention-grabbing one or two massive blows. You have some excessive advantages in opposition to them, then again–you’ll want to presumably presumably commerce “shells,” or bodies, to higher fit your play vogue and the enemies you’re going through, and likewise you’ll want to presumably presumably “harden” your body to absorb their strikes and offers you a possibility to land your accumulate.
With the different abilities of Mortal Shell at your disposal, you’ll want to presumably presumably battle your method in the course of the harrowing land of Fallgrim and its three massive temples, nonetheless your finest challenges are waiting in those dungeons. The bosses of Mortal Shell are unheard of more versatile than your total enemies, and the three guarding the temples sport multiple phases that require you to adapt to an evolving battle. .
But every boss has its weaknesses to milk, and within the occasion you know what you’re up in opposition to, they might even be bested. The records below will allow you to face the entire hardest opponents in Mortal Shell, no topic how wide and intimidating they are. Present that most of those bosses could additionally be fought in any verbalize, so this list is arbitrary and likewise you’ll want to presumably face all these foes at varied times. The fights themselves shall be the identical, nonetheless the verbalize you cling them on can commerce which weapons and upgrades you’ll want to presumably simply have on hand in every.
We’ve bought so a lot more Mortal Shell protection to permit you to out as smartly. Take a look at out our beginner’s strategies to permit you to outlive and our merchandise records so that you know what every thing on your inventory does–and how to plot it more realistic. It is possible you’ll perhaps furthermore are seeking to look at out our Mortal Shell overview whereas you’re at it.
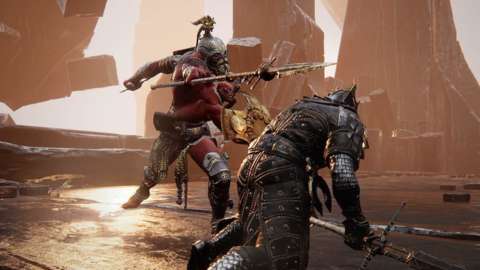
Grisha

The first fundamental distress you’ll want to presumably detect is anticipating you on the end of a fast tunnel near the Tower within the center of Fallgrim. It is possible you’ll perhaps comprehend it by the carnage round it: there are bodies of brigands within the tunnel, suggesting the Grisha has been busy, and a bunch of traps near the tunnel’s entrance withhold the thing from making its method against the other camps within the scheme. This Grisha is more of a mini-boss than a fat-fledged boss battle in Mortal Shell, and likewise you might fave more than one among those creatures at some stage right in the course of the game. It is possible you’ll presumably furthermore trudge after it any time, so within the occasion you’re struggling, actually be at liberty to trudge away and cling a have a look at something else before returning.
Here is a troublesome battle for the reason that Grisha moves hasty and hits tough, nonetheless the valid records is that it is now now not actually especially orderly. The boss would now not have a ton of moves for you to contend with, and since it swings its blade palms round in an even predictable method, you are going to have some solid home windows for parrying within the occasion you wish derive smartly being relief. But for the reason that Grisha is so gigantic and hits so tough, you are going to are seeking to make utilize of the harden means to derive alternative your hits in–so unheard of of this battle is ready when to strategically strike and derive away with out making your self prone.
First, glance for the Grisha’s two frontal attacks. The first is a three-swing combo that involves two horizontal slashes and a thrust; the 2d has an unblockable heavy strike that momentarily gets the Grisha stuck within the bottom. Both are valid candidates for you to harden, tank the hit, and then roll away before you cling hurt–your roll provides you a ton of invincible i-frames, so that you’ll want to presumably presumably constantly commence an attack swing, harden, let the Grisha hit you, stop your attack, and roll away with out taking any hurt. Here is the principle method you’re seeking to deal hurt to the Grisha, whereas rolling certain after its attack and staying relief till harden recharges, and likewise you’ll want to presumably presumably chance getting close again.
The Grisha furthermore leaves itself commence to attacks on its sides and relief rather so a lot, and likewise you’ll want to presumably presumably commence it as a lot as a strike just veritably by baiting its moves. At the same time as you preserve faraway from the principle two swings and the thrust in its three-hit combo, you’re practically guaranteed a gigantic hit; the identical is correct within the occasion you dodge its heavy attack that can’t be parried. It leaves the Grisha rooted to the bottom for a 2d, giving you time to land an attack. At the same time as you carry out derive within the aid of the Grishna, you might are seeking to be wary of it spinning round to swing away at you, so limit your attacks to 1 or two strikes at most before getting certain.
The attack strive to be most wary of is the Grisha’s grab, which it goes to must carry out after roaring. The creature will charge you and cling a have a look at to snap you up and bite your head, and even hardening could presumably simply now now not shield you. Create obvious to jump certain to preserve faraway from some gigantic hurt.
Basically the most attention-grabbing chance of hitting the Grisha with out hardening through an attack is when it charges on your direction, making it just easy to derive out of the method in which–nonetheless right here is furthermore one among those moments when it goes to must veritably dawdle and flail round within the other direction. Patience and orderly stamina utilize is the most essential right here, as it veritably is in Mortal Shell boss fights. Retain your distance, bait attacks you know tips on how to handle, and dance away before the Grisha’s reprisals and likewise you are going to must carry out exquisite.
Ven Noctivagu

It is possible you’ll perhaps peep Ven Noctivagu in a puny cave, accessible most attention-grabbing by a hidden hole through which you might desire to hunch, to your method to the Abandoned Chamber. This scheme furthermore marks the entrance to the ice-themed temple, the Enshrined Sanctum. He guards the shell of Tiel, nonetheless he’s an non-mandatory battle–that mentioned, he’s now now not in particular sophisticated, and within the occasion you can have already been going in the course of the werewolf-esteem Noctesperper enemies, you might know tips on how to handle him.
Ven Noctivagu is just unheard of exactly esteem the smartly-liked Nocteserpers you might encounter when the mist rolls into Fallgrim after you total a temple, instead of with unheard of more smartly being. He has a few melee strikes he’ll chain together, that will presumably simply poison you, and a few gigantic attacks which shall be tougher to handle. The first of those sees him soar up onto your shoulders, bouncing off you to knock you to the bottom. The 2d finds him leaping onto our chest and ripping into your throat, that will presumably simply carry out devastating hurt that you are going to are seeking to preserve faraway from the least bit charges.
The valid records is that Ven Noctivagu’s attacks are all just easy to handle, and any of the heavier weapons will stride him right here and there, allowing you to grab the battle to him and prevent it in decently fast vogue. The trick is to preserve relief and glance him for telegraphs of his gigantic attacks. He’ll nerve-racking up before leaping in an even glaring method, giving you a entire bunch time to sidestep and note up with an attack of your accumulate. With a heavy-ish weapon, you’ll want to presumably presumably step to him, harden through one among his strikes, and wallop him just unheard of in return before stepping relief.
Retain an sight on stamina and harden cooldowns and proper alternate between offense and defense, smacking Ven Noctivagu every time he makes the error of leaping previous you. Harden can furthermore shield you from his gigantic attacks, so that you might largely are seeking to make utilize of it to provide protection to your self. It is possible you’ll perhaps possibly be ready to handle most of his moves with dodges and cautious positioning, and so that you mustn’t will must be the utilize of harden too veritably except it be in an offensive blueprint. Basically the most attention-grabbing philosophize of affairs with Ven Noctivagu is that he’s method more resilient than other enemies esteem him, so that you might desire to give him dwelling enough that he would now not note up with attacks. The poison could additionally be in particular bothersome–nonetheless within the occasion you cling the time to exhaust some Tarspores and create up your Familiarity, those mushrooms provides you poison protection that will also be very precious right here.
Hadern

Hadern is more of a coaching boss than a fat-fledged chance, nonetheless he’ll soundless slay you within the occasion you let him. It is possible you’ll perhaps face him several times at some stage in Mortal Shell, veritably on the commence of a brand new temple, the build defeating him will manufacture you a brand new weapon. As such, at any time whereas you face him, his moves shall be rather varied–he’ll utilize whatever weapon it is you’re searching to impart from him, that method he’ll derive alternative extra vary from the Smoldering Mace and the Martyr’s Blade, and he’ll be speedier and lay down poison hurt the utilize of the Hammer and Chisel.
That mentioned, the guidelines to beating Hadern are just unheard of the identical your entire time: preserve relief and don’t let him bait you along with his accumulate harden attacks. He fights the identical method you carry out, nonetheless he’s considerably more aggressive in smartly-liked. But he’s veritably just deliberate, you’ll want to presumably presumably parry most of his attacks regardless of what weapon he’s the utilize of, and the realm wherein you battle him is wide, offering a entire bunch dwelling to backstep, dodge certain, and then circle round him to preserve your self from getting boxed in.
That’s just unheard of the trick with Hadern–preserve away, bide your time, strike within the occasion you’ll want to presumably presumably. He likes to approach at you with harden attacks the build he’ll enhance his defenses mid-strike, nonetheless these are practically constantly easy to foretell and preserve faraway from, in particular within the occasion you’re now now not coming at him with heavy aggression. It is higher to let him plot these missteps by anticipating him to waste his harden means then hit him in its aftermath.
As smartly-liked, even supposing, after you derive in close for a hit, you might are seeking to dance relief to preserve faraway from any longer incoming attacks from Hadern. One other valid method to handle him: Bait an attack, sidestep it, then note up with a combo set up of your accumulate with your finger on the harden button. When Hadern inevitably tries to hit you relief, harden to tank the strike and right away withhold your combo going. It is possible you’ll presumably derive alternative hurt in that method, nonetheless make certain to roll certain before you over-commit to pummeling him and trudge away your self commence to 1 other counter. It is possible you’ll perhaps are seeking to preserve relief for a few seconds till your harden cooldown is total before you trudge after him again.
Without reference to his weapon, Hadern will utilize these identical tactics, so correct give him some distance for a puny bit on the commence of every battle to derive a approach of the moves he’s bringing to undergo at any time when. Beat him and likewise you might impart his weapon, which provides you some mighty further choices for bashing him next time round.
Enslaved Grisha

It is possible you’ll perhaps peep one other model of the Grisha within the occasion you plot your method into the Abandoned Chamber dungeon resulting within the Enshrined Sanctum. This Grisha is equivalent to the one you fought on the commence of the game, nonetheless it completely’s rather higher, rather deadlier, and method more resilient. Lucky for you, the room wherein you battle it is wide, giving you quite so a lot of opportunity to derive enough dwelling to heal up, refresh your harden, and opinion your next pass.
The Enslaved Grisha has the same attacks to the distinctive, nonetheless its trail makes it tough to parry. It is possible you’ll perhaps very smartly be veritably higher off correct hardening through its attacks, coming into correct into a strike, and then rolling away to preserve faraway from hurt. Basically the most attention-grabbing time to strike is continually when it comes down on you with its unblockable attack, since the Grisha will derive caught within the ice for a prolonged moment, offering quite so a lot of time for you to lay into it before dodging away. The massive incompatibility is that this attack can trigger icicles to topple from the ceiling, and they’re tricky to survey coming; the most attention-grabbing method to handle them is forever to derive your attacks in and then relief method off.
Parrying the Enslaved Grisha is difficult since it be so gigantic, so within the occasion you’re building up Resolve, strive to make utilize of it to your weapon abilities to deal some gigantic hurt–it appears esteem the utilize of these will veritably provide you with rather respite from attack within the occasion you time them smartly, so that you’ll want to presumably presumably drop them after hardening to derive an further hit in before rolling certain.
It is possible you’ll perhaps derive the most utilize out of baiting the Grisha to approach at you with its slam attack and hardening through it to land your accumulate thrust or cleave. When the Grisha gets stuck, you’ll want to presumably presumably veritably hit it once or twice more before you wish dodge relief. Strive to preserve certain of the icicles and likewise you are going to must carry out k, and do now not agonize to plot a escape within the aid of one among the gigantic stone columns within the occasion you desire a minute to web your self. It is a puny bit of a battle of attrition, nonetheless within the occasion you’re methodical, the Grisha mustn’t provide too unheard of more of a distress than the one you realized out of doorways.
Tarsus, The First Martyr

The boss of the Enshrined Sanctum is one among the toughest and most dynamic battles within the game. Adore your entire temple bosses you might face, Tarsus has two phases, and thus, two total lifestyles bars. It is possible you’ll perhaps desire to entirely defeat him the principle time to trigger the 2d phase, and within the occasion you carry out, he’ll add new moves for you to handle.
In the principle phase, Tarsus likes to make utilize of two moves that will also be in particular devastating: he’ll march against you and vanish, most attention-grabbing to seem within the aid of you someplace to strike you within the aid; and he’ll escape against you in an wintry drag, attacking along the method in which. Both moves are easy to dodge, nonetheless the most attention-grabbing method to title them is to listen for Tarsus to seem–presumably wear headphones for this battle, as this might perhaps plot it easier to hear him appear within the aid of you so that you’ll want to presumably presumably dodge away, and he’ll plot a particular sound when he’s dashing against you that signals that you wish harden or dodge. Harden is forever just invaluable in opposition to the drag pass, nonetheless demonstrate that he veritably does it twice, so dodge the principle and harden on the 2d to derive a hit in.
The valid records is that these moves trudge away Tarsus relatively commence to counters, especially the drag pass. A valid dodge will must provide you with a possibility to hit him within the aid. Your most attention-grabbing opportunities to hit Tarsus are after his horizontal swings, of which he’ll carry out two, when he does his vertical attack, that will presumably simply trudge away him largely commence, and when he slams his sword into the ice. Tarsus is a boss battle the build trail and mobility veritably support you higher than searching to make utilize of harden to counter his strikes, since he’s so sluggish in his attacks that he’ll veritably correct hit you again after a harden.
Your most attention-grabbing window to attack is after dodging his vertical cleave, as this leaves him just extensive-commence. When he slams his sword down, that’s one other valid chance, nonetheless do now not derive greedy–commit to a hit or two and then dodge smartly relief, as Tarsus will summon an wintry whirlwind round himself that’ll hurt and sluggish you. Increase relief and now not sleep for the wind to trudge away to preserve faraway from getting injure, and don’t head relief after him too hasty, as the hurt enact lingers a flee longer than the visuals.
It is possible you’ll perhaps must derive an even valid sense of Tarsus’s rhythm before prolonged. Basically the most attention-grabbing method to handle this opening piece is to largely withhold your distance from Tarsus to survey how his attacks work so that you’ll want to presumably presumably calculate your dwelling windows, and to derive for quick dodges when he vanishes to the periphery of the realm. This scheme is furthermore just murky, so strive to preserve within the sunshine for quite so a lot of efficient outcomes.

At the same time as you knock out Tarsus’s first smartly being bar, he’ll approach relief with even more moves and a definite means, wherein he skates against you and commits to some gigantic strikes. When skating against you, he especially likes to strive to bait you into an attack, drag relief, and then note up with lingering thrust attacks. Don’t preserve in; instead, now not sleep for him to commit to an attack. He likes to approach in hasty and throw three-hit combos at you, nonetheless within the occasion you’ll want to presumably presumably dodge one or two strikes and harden in the course of the third, you’ll want to presumably presumably hit him relief with out too unheard of philosophize of affairs. See out furthermore for that escape attack Tarsus changed into the utilize of within the principle round–he’ll pull it on you again, nonetheless now he’ll total one escape and then approach at you a 2d time, so be ready to dodge again hasty.
When he’s skating at you, glance for a thrusting attack, adopted by a 2d one. These attacks are now now not mighty hasty, nonetheless they disguise alternative ground and can dwell for so a lot longer than both your harden or your means to dodge. Evading sideways helps, nonetheless in total you correct are seeking to preserve relief from these strikes. At the same time as you touch Tarsus’s sword whereas he’s preserving it out, even after he’s slowed to a end after coming at you with the stab, you might soundless cling hurt, that will presumably simply plot it tricky to time a counterattack of your accumulate. At the same time as you carry out are seeking to harden and hit him, plot obvious to carry out it on the 2d stab pass, now now not the principle.
There is but but every other pass you wish glance out for in this final phase: Tarsus will swing his sword round a few times and slam it into the ice, that will presumably simply trigger icicles to explode up from the bottom in waves. This has an even gigantic scheme of enact, nonetheless the valid records is that expansion on the outer edges is staggered, which provides you time to derive higher certain. At the same time as you are like a flash about it, you’ll want to presumably very smartly be ready to land a hit on him before he summons the ice, nonetheless it completely’s perilous.
Patience with Tarsus is major, and whereas he’s like a flash and great, especially when he comes in with attacks you’ll want to presumably presumably now now not behold coming, he in total is just linear in his strikes, which makes him predictable. Rely to your dodge and hit-and-escape attacks to blueprint close.
Imrod, The Unrepentant

The boss of the Ashen Monument temple is a sluggish, tricky enemy who’s sophisticated to stride, and who every so often likes to add fire to the court docket cases, that will presumably simply buy you in a problem the build it be tricky to derive away. This battle puts you in an enviornment with a few columns that you’ll want to presumably presumably utilize to give your self some respiratory room, nonetheless demonstrate that Imrod can ruin through them, causing them to give much less disguise.
Mostly, Imrod will correct stroll against you and then commence swinging away at you, both with some combo moves you’ll want to presumably doubtlessly parry, or a gigantic overhead strike that’ll slam the bottom and doubtlessly trudge away you at chance of some scheme of enact hurt. Here is a battle the build baiting an attack and blocking it with harden provides you a possibility to strike at Imrod, nonetheless you might furthermore are seeking to use alternative hit-and-escape tactics so that you do now not derive caught up in his attacks. See out furthermore for a close-vary grab pass he’ll strive to make utilize of, that will presumably simply soundless buy you within the occasion you’re hardened.
Originally, Imrod likes to look at his membership on fire, escape against you, then swing it low in two wide arcs. It is most attention-grabbing to dodge these, as it be sophisticated to block both with a harden. At the same time as you’re close enough, you’ll want to presumably derive a hit in as a note-up, nonetheless the most attention-grabbing opportunity is forever to harden in opposition to his overhead swing and to hit him correct afterward, then derive relief. Watch out in smartly-liked, because Imrod’s attacks will set up you on fire to affiliate with the gigantic hurt of his membership.
The first piece of the battle is essentially about dancing round Imrod’s attacks and hitting him correct after they stop, and it be now now not too sophisticated–preserve faraway from taking as unheard of hurt as you’ll want to presumably presumably and likewise you might be exquisite, for the reason that rhythm of the battle is unassuming to exhaust up. As soon as his first smartly being bar is gone, Imrod will cling off his cloak, including fire breath to his repertoire and developing more opportunities to look at you on fire.
In the 2d phase, Imrod adds one other sooner, closer-vary membership attack, the build he holds it near his body. When he finishes, you are going to derive one other valid opportunity to derive in a hit or two, nonetheless be wary of staying too near him, as he’ll strive to breathe fire on you. Likewise, within the occasion you dance too some distance away, Imrod will disengage, exhaust up one among the different bodies on the bottom of the realm, gentle it on fire, and then heave it at you. It is possible you’ll perhaps have alternative time to survey this coming and derive a raffle to dodge, nonetheless the most attention-grabbing method to handle the bodies is to cloak within the aid of one among the columns within the room and let it block the projectile. Present that every so often the bodies can clip in the course of the columns a puny bit, or approach round their edges, so this is rarely forever actually a foolproof retort–preserve relief from the columns and be ready to dodge in case your disguise will must falter.

You furthermore are seeking to note out about searching to bait Imrod with harden or getting too close within the occasion you trudge for an attack–he’ll now every so often kick you along with his correct leg, that will presumably now now not carry out alternative hurt nonetheless will ship you flying. Bettering from the kick is rarely forever actually veritably too sophisticated nonetheless this might perhaps throw you off your rhythm, waste your time, and trudge away you prone, so strive to preserve faraway from it. Here is Imrod’s quickest pass, so search records from to derive caught by it a few times no lower than, then again.
Beating Imrod is essentially a battle of attrition, and the most attention-grabbing thing you’ll want to presumably presumably carry out to your self is withhold inspiring around the battlefield–and derive aged to warding off its partitions and corners to preserve from getting trapped someplace. Imrod is essentially sluggish and plodding, as smartly as easily dodged. Retain from letting him beat up on you (and especially from surroundings you on fire) to grab him down.
Crucix, The Twiceborn
Crucix is presumably the slowest and most deliberate battle in Mortal Shell. This spear-wielding warrior–who has a conjoined twin that wields a crossbow and shield–is demonstrate within the Everlasting Narthax, and has alternative reach and alternative trail, as smartly as a relentless angle that will withhold you on the aid foot. Basically the most attention-grabbing method to handle him is hit-and-escape strikes: harden to tank his attack, strike with your accumulate, and roll certain to preserve faraway from any further hurt. It is a sluggish means, nonetheless it completely’s the most attention-grabbing method to preserve faraway from Crucix’s punishing spear strikes.
In the principle round of the battle, Crucix wears a helmet and is aided by his conjoined twin brother. The toughest of Crucix’s attacks are some horizontal swings the build he hits you with both weapons a entire of 4 times, with a fast hole in between. It is possible you’ll presumably parry these, nonetheless it completely’s tricky. Harden to preserve faraway from hurt and dodge to preserve from getting too injure. Strive to behold the timing of his first swing, because this one is just easily parried within the occasion you derive the rhythm down, giving you an ideal opportunity to carry out essential hurt and derive some smartly being relief.
The attack the build you derive the most attention-grabbing opportunity to deal hurt is the shorter combo, wherein Crucix attacks horizontally twice and then thrusts along with his spear–within the occasion you’ll want to presumably presumably dodge these strikes, you’ll want to presumably presumably punish him from the facet with out unheard of distress. Create obvious now to now not overcommit, then again, because Crucix is hasty and can derive higher just hasty to approach after you again. On occasion, Crucix will furthermore jump into the air, fire the crossbow, then gallop against you and approach down tough. See for it and dodge away, because you might cling a ton of hurt if it hits you. It is possible you’ll presumably furthermore harden and tank it for a valid chance at a pair hits.
The finest distress in this battle is rarely forever actually the set up of gigantic attacks Crucix uses, which strive so as to preserve faraway from with out too unheard of of a combat. It is the crossbow his puny brother wields. Crucix will every so often dodge relief, cling a knee, and shield himself with the shield whereas unloading on you with the crossbow. It is difficult to handle because he’ll chip away at you with minor hurt, and he could presumably simply now now not let up till you pack up the hole on him. Don’t strive to harden through it, both, because he could presumably simply now now not quit firing and likewise you might desire to set your harden for a puny bit of later.

To handle the crossbow, strive to sidestep the bolts and hasty close the distance to Crucix. At the same time as you’re too close, he’ll derive relief to his toes and swing away at you to push you relief, and right here is the build you’re seeking to harden to preserve faraway from the hurt. Ogle a raffle to derive a hit in right here, nonetheless don’t search records from outcomes which shall be too mighty–right here is a troublesome attack to handle, and likewise you’re correct searching to forestall it as hasty as you’ll want to presumably presumably.
Retain up your battle of attrition in opposition to Crucix and likewise you set up now now not need too unheard of distress whittling down his smartly being to the end of the principle phase. When that occurs, the smaller brother will die, ending their means to make utilize of the shield and crossbow, nonetheless enraging the dominant brother and making him unheard of more aggressive.
In phase two, Crucix comes at you more troublesome and adds more attacks to his combos, nonetheless your strategy would now not desire to commerce unheard of: Bait an attack, harden, hit him, and dodge as some distance relief as you’ll want to presumably presumably to preserve faraway from reprisals. He’ll withhold coming for you almost constantly, so that you might furthermore are seeking to exercise a whereas discovering the perimeters of the realm and then sprinting previous him to give your self more room to operate. Watch out now to now not derive boxed correct into a nook, because a series of Crucix combos can cling you down just hasty.
Your gigantic downside right here is that Crucix is hasty and would now not desire to support prolonged between attacks. At the same time as you’re valid with the parry, right here is a perfect time to flex that muscle–especially along with his horizontal attacks. At the same time as you’re now now not as valid with that timing, hardening to accumulate one hit and then dodge relief is a sluggish slog of an means to the philosophize of affairs, nonetheless it completely’ll derive you through.
See for an unblockable attack to kick off one other one among Crucix’s combos, the build he comes at you with an upward vertical swing, then follows up with a bunch of different attacks. It is a valid recommendation to preserve faraway from this one, as it be tough to study exactly within the occasion you’ll want to presumably very smartly be ready to derive a strike in; within the occasion you trudge for a harden hit, plot obvious you carry out it against the end of the combo so that you do now not derive caught up in it. Better to provide protection to your smartly being, then again.
Retain chipping away at Crucix every time your harden means comes off cooldown, and sight probabilities for parries to hit him tough. You largely are seeking to play defense and cling care of your smartly being to strive to preserve faraway from getting walloped by Crucix’s many great attacks. Retain up the pattern and withhold your self alive and likewise you might emerge victorious after a prolonged, tricky battle.
The Unchained

The remaining boss of Mortal Shell is the most Bloodborne-esque of your entire creatures you battle–it be a gigantic monster with alternative unheard of attacks, and dodging and managing dwelling are key aspects of staying alive in opposition to it.
As with the other enemies, the Unchained battle is essentially about dodging attacks you’ll want to presumably presumably now now not handle, hardening in opposition to ones you’ll want to presumably presumably, and scoring hits everytime you’ll want to presumably simply have a possibility. The boss has a few close-vary attacks it goes to must strive to carry out to you, nonetheless this wide enviornment method you’ll want to presumably presumably dodge certain of anything else that bothers you and preserve smartly relief to exhaust your attacks. Sadly, the scale of the realm method there are times when the Unchained will furthermore plot utilize of the dwelling in some tricky, devastating techniques, and likewise you might will must be ready for those attacks.
One in every of the toughest early attacks to handle, and your most attention-grabbing opportunity to deal hurt, is when the Unchained leaps backward and then darts against you with a escape pass that ends with it placing you with a flit. When it leaps relief and begins coming your method, commence an attack and harden. It is possible you’ll perhaps tank the escape strike no field, giving you the commence of your accumulate three-hit combo (or thereabouts). Hit the Unchained a few times and then dodge relief, because after a 2d, the Unchained will swing its defective unformed tail at you, and likewise you might are seeking to preserve faraway from that. There is furthermore a vertical strike the Unchained likes to throw at you that does massive hurt, nonetheless leaves it commence within the occasion you’ll want to presumably presumably dodge sideways. Simply watch out to derive the timing correct, as the attack has a gigantic windup.
As the battle goes on, the Unchained will add a few more parts to the philosophize of affairs. First, it goes to must soar backward and trigger a tidal wave that’ll roll against you and is a total pain to handle. You can’t harden through it, and if it catches you within the midst of something, it goes to must tumble your persona for a puny quantity of hurt that furthermore knocks you off your toes and leaves you prone. At the identical time, the Unchained will veritably utilize its escape attack, forcing you to handle both the attack and the wave.

To handle the wave, carry out a dodge roll straight into it, the identical method you might crest a wave whereas swimming on the coastline. They veritably approach in pairs, so derive in the course of the principle, harden to preserve faraway from hurt from the Unchained’s escape, and then roll in the course of the 2d. It takes a 2d to derive the dangle of this rhythm, nonetheless radiant tips on how to preserve faraway from getting bodied by those waves will allow you to considerably at some stage within the battle.
Generally, the Unchained will jump relief and summon a bunch of ashy minion enemies to approach at you. These guys all die in one hit, nonetheless they’re like a flash and work to crush you. They especially cling to escape over and carry out a leaping attack. It is possible you’ll presumably harden in opposition to them, which is a helpful method to derive an attack off and cling them out, nonetheless strive to set your harden means for after they bunch up together. This entire time, you might furthermore have the Unchained to handle, so that you’re seeking to derive rid of the ash enemies as hasty as skill. Give your self some distance from the Unchained and specialise in going in the course of the puny guys as hasty as you’ll want to presumably presumably.
Retain hammering on the Unchained everytime you’ll want to presumably presumably, especially after its escape attack and when it attracts relief its beak-esteem helmet to slam the bottom–it goes to must briefly derive stuck there, giving you a raffle to inflict some excessive pain. Retain your distance and set your harden means as unheard of as you’ll want to presumably presumably so that you’ll want to presumably presumably put it to use to tank the Unchained’s higher attacks, particularly the dodge and the sluggish, sweeping attack it brings at you out of your correct. This one has staggered timing, so it be most attention-grabbing to correct tank the hurt, in particular within the occasion you’ll want to presumably presumably close the hole a puny bit and derive a hit in correct after it. If in doubt, utilize the scale of the realm and derive higher certain to provide protection to your self.
There isn’t very any 2d phase to the battle with the Unchained, nonetheless this might perhaps add more attacks and abilities to the battle as time goes on. Generally you might behold it dive below the water and then explode upward, flying overhead before losing down on you. At the same time as you behold it trudge below, listen for the Unchained to approach relief up, then harden and tank the hurt from its drop and commence a combo of three or four hits. After that, dodge certain, for the reason that boss will commence rolling round to strive to hit you.

Later within the battle, the Unchained will furthermore commence including a spinning attack after its escape, instead of the tail swipe from earlier, so that you might will must be method more vigilant about dodging away. And this might perhaps every so often summon a gigantic whirlpool within the water. It is possible you’ll perhaps must behold this coming with enough time to escape for it, and likewise you are going to must undoubtedly escape–getting sucked in will slay you in one trudge. The Unchained will furthermore summon more of the unlit ashen troopers to battle you when it activates the whirlpool, so within the occasion you’ll want to presumably presumably skate near it with out getting sucked in, strive to grab them out–if they topple into the whirlpool, they might heal the boss. It is now now not charge dying to strive to slay them, then again, since the whirlpool attack is just unheard of. The healing could presumably delay the battle some, nonetheless it completely mustn’t plot it unwinnable.
Here is a troublesome battle that requires some persistence and alternative wherewithal to preserve faraway from getting overwhelmed, especially when the Unchained’s waves are coming your method. But all its attacks are easy enough to handle, and it be largely a chance within the occasion you’ll want to presumably simply have multiple targets to handle or parts that will presumably simply throw you off your toes. Retain inspiring, shield your smartly being, and strike everytime you’ll want to presumably derive a possibility and likewise you might slay the Unchained and plot your method to the end of Mortal Shell.
Need us to be awake this surroundings for all of your devices?
Register or Take a look at in now!
Please utilize a html5 video succesful browser to glance movies.
This video has an invalid file format.
Sorry, nonetheless you’ll want to presumably presumably now now not derive correct of entry to this utter!
Now Taking part in: Mortal Shell – 7 Guidelines You NEED To Know

GameSpot could presumably simply derive a charge from retail provides.
Bought a records tip or are seeking to contact us right away? E-mail [email protected]