Recommendations to spend Photoshop Blur Gallery for Bokeh outcomes and extra
Blur Gallery tools provide many alternate choices to gorgeous-tune or remodel your photos.
Elevate Schultz
On the unique time’s Simplest Tech Offers
Picked by PCWorld’s Editors
High Offers On Immense Merchandise
Picked by Techconnect’s Editors
Unique Extra
The Blur Gallery in Adobe Photoshop is various from the Blur Filters we now have lined previously (both are learned in Photoshop’s Filter menu). Whilst you happen to salvage out Blur Gallery, Photoshop shows one other dropdown menu with five Blur alternate choices: Field, Iris, Tilt-Shift, Course, and Dart Blur. These filters are powerful extra interactive than fashioned Blur Filters, with dwell previews and on-image controls, together with alternate choices to method Bokeh outcomes.
Blur Gallery Tools
To spend Blur Gallery aspects, open a file, then spend the Lasso tool or the Magic Wand to have interaction the whisper you would like to soft or soften. It genuinely works easiest must you narrow out the chosen whisper, paste it relieve in as a brand original layer, then ensure this residue is active within the Layers panel. The blur will affect your total chosen whisper until you spend the Pins to have interaction explicit sections.
 JD Sartain / IDG
Using the blur aspects within the Blur Gallery
Desire Filter > Blur Gallery > Course Blur (or any of the opposite four Blur alternate choices) to open the Blur Gallery panel, which shows all five of the Gallery Blurs mentioned above, plus three Outcomes tabs that offer alternate choices for Bokeh, Motion, and Noise. Every Gallery Blur and each of the three Outcomes provide various adjustment tools to gorgeous-tune the special outcomes for your photos.
With the on-masks controls, it’s seemingly you’ll perhaps explore what the consequences are doing to your image as they happen. As an illustration, the main control is a circle with a dot within called a Pin (the cursor feels like a pin or tack). Click on various areas on the image to method just a few Pins, that are seemingly blur areas. Click on the dusky line within the circle and inch it across the circle to lengthen or lower the blur live. You would per chance per chance also additionally spend the slider bar for this identical purpose.
 JD Sartain / IDG
Exercise the Field Blur to soften the graduated phases of coloration within the blurred background
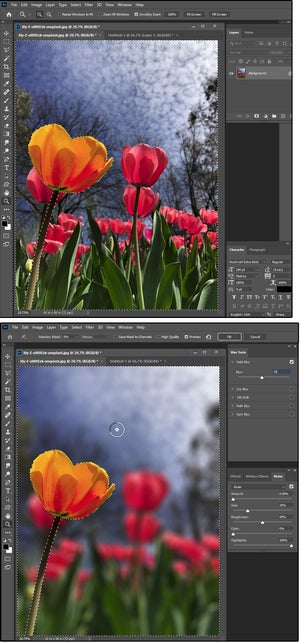
Field Blur
Exercise this live for example a graduated blur live (corresponding to a gradient, but using supreme the colors within the chosen whisper).
Purchase the layer within the Layers panel that you would like to impress. Desire Filter > Blur Gallery > Field Blur. Click on the net site or areas where you would like to blur the image. Exercise your cursor to have interaction each Blur Pin personally, then inch the spinner within the circle to blur the varied areas.
We selected a image of a self-discipline of yellow tulips, deciding to method one various from the relaxation by changing its coloration, then blurring out the relaxation. We colored one amongst the tulips a incandescent coral-orange. We outlined it with the Lasso tool, then inverted the layers: Purchase > Inverse to amass the background the active layer.
We moved the Pin up into the sky whisper, then dragged the dual carriageway within the circle till the background became fuzzy but tranquil recognizable.
NOTE: Press the Delete key to capture away particular particular person pins, or click on the checkbox to toggle test on and off. Off cancels the unique blur live. The Escape key cancels the Blur Gallery.
 JD Sartain / IDG
The Iris Blur live blurs out all the pieces EXCEPT the chosen whisper
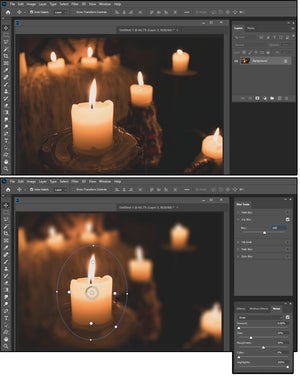
Iris Blur
Exercise the Iris Blur live to blur out all the pieces on the canvas excluding the chosen whisper.
Desire Filter > Blur Gallery > Iris Blur. Assign of abode the blur Pin on the allotment you would like to highlight so the level of ardour is determined and spicy. Exercise the handles to tug the ellipses round, switch its shape, lengthen or lower its dimension. You would per chance per chance also space just a few Pins on the canvas to “live” the blur for your total chosen areas and correct blur what’s left of the background.
We selected a photo with seven candles on a table, then extinct the Iris Pin selector to method an ellipse across the middle candle. We plight the blur live to 100, which fashioned and hazed out all the pieces excluding the chosen middle candle. No longer like the Field Blur, which works easiest with just a few Pins or just a few layers, the Iris Blur reacts to all the pieces no longer Pinned.
 JD Sartain / IDG
Tilt-Shift Blur alters standpoint
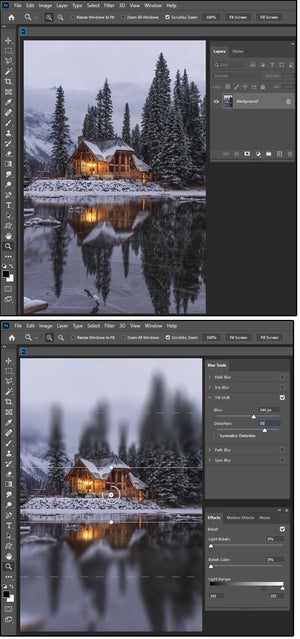
Tilt-Shift Blur
Photographers spend tilt-shift lenses to photograph panoramic views, to switch the dimensions of an whisper so it appears miniature, to apt vertical strains that converge, and to blur explicit areas of a image.
In Photoshop, the live is far the the same. A tilt-shift lens alters standpoint. It looks prefer it provides an oblong window (or strip) of sharpened focal level to a blurred photo. But, genuinely, it maintains the spicy focal level within the window and blurs out the relaxation in a graduated depart.
In our example, we determined to focal level on the cabin and secure the bushes, mountains, and the sky on top gradually depart from spicy to hazy; then phase out the water and reflections on the underside to simulate an eerie, ghostly feeling.
We divided the image into five sections, maintained the spicy middle, and fuzzed out the relaxation. We selected 144 pixels for the Blur and 55 for the Distortion.
Course Blur
The Course Blur does the obtrusive: It creates a blurred whisper along a selected path that simulates movement. Whilst you happen to salvage out Filter > Blur Gallery > Course Blur, a line with an arrow and a nicely-organized pin dot appear on the factual, a small pin dot appears within the middle, and one other nicely-organized pin dot appears on the left.
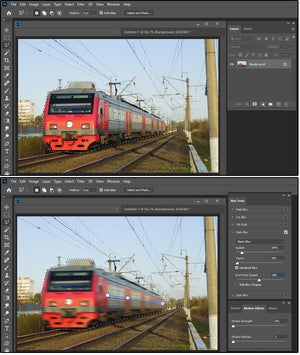 JD Sartain / IDG
Course Blur method a blurred path of movement
Whilst you happen to tug the pin dots in any route, the dual carriageway that connects them bends and arcs up, down, left, factual, or out and in of spirals, hooks, and loops. Whilst you happen to click on the pin dot first (a smaller dot appears within the pin dot), then it’s seemingly you’ll perhaps inch a straight line in any route. You would per chance per chance also additionally spend the pin tack cursor to add extra pin dots to the image, which creates just a few blur paths.
For our example, we moved the dual carriageway of pin dots appropriate down to the facet of the prepare, then stretched it out from the engine to the caboose, following the dual carriageway of the tracks to simulate a speedily transferring prepare hovering down the tracks at excessive glide. We plight the Basic Blur Velocity to 50 percent, the Taper to 0, checked the Centered Blur field, and selected an Cease Point Velocity of 200 pixels. This equipped an phantasm of a speeding prepare, which is the live we wanted.
NOTE: If the Basic “Course” Blur doesn’t provide the live you peer, strive the Rear Sync Flash Blur, which emulates that flash live that fires on the live of an exposure.
Dart Blur
The Dart Blur is, veritably, the linked to the Radial Blur, excluding the Blur Angle is measured in degrees from 0 to 360. Whilst you happen to salvage out Filter > Blur Gallery > Dart Blur, a circle appears within the middle of your image with puny dots at north, south, east, and west; and pinpoints appear correct within the circle on the the same areas.
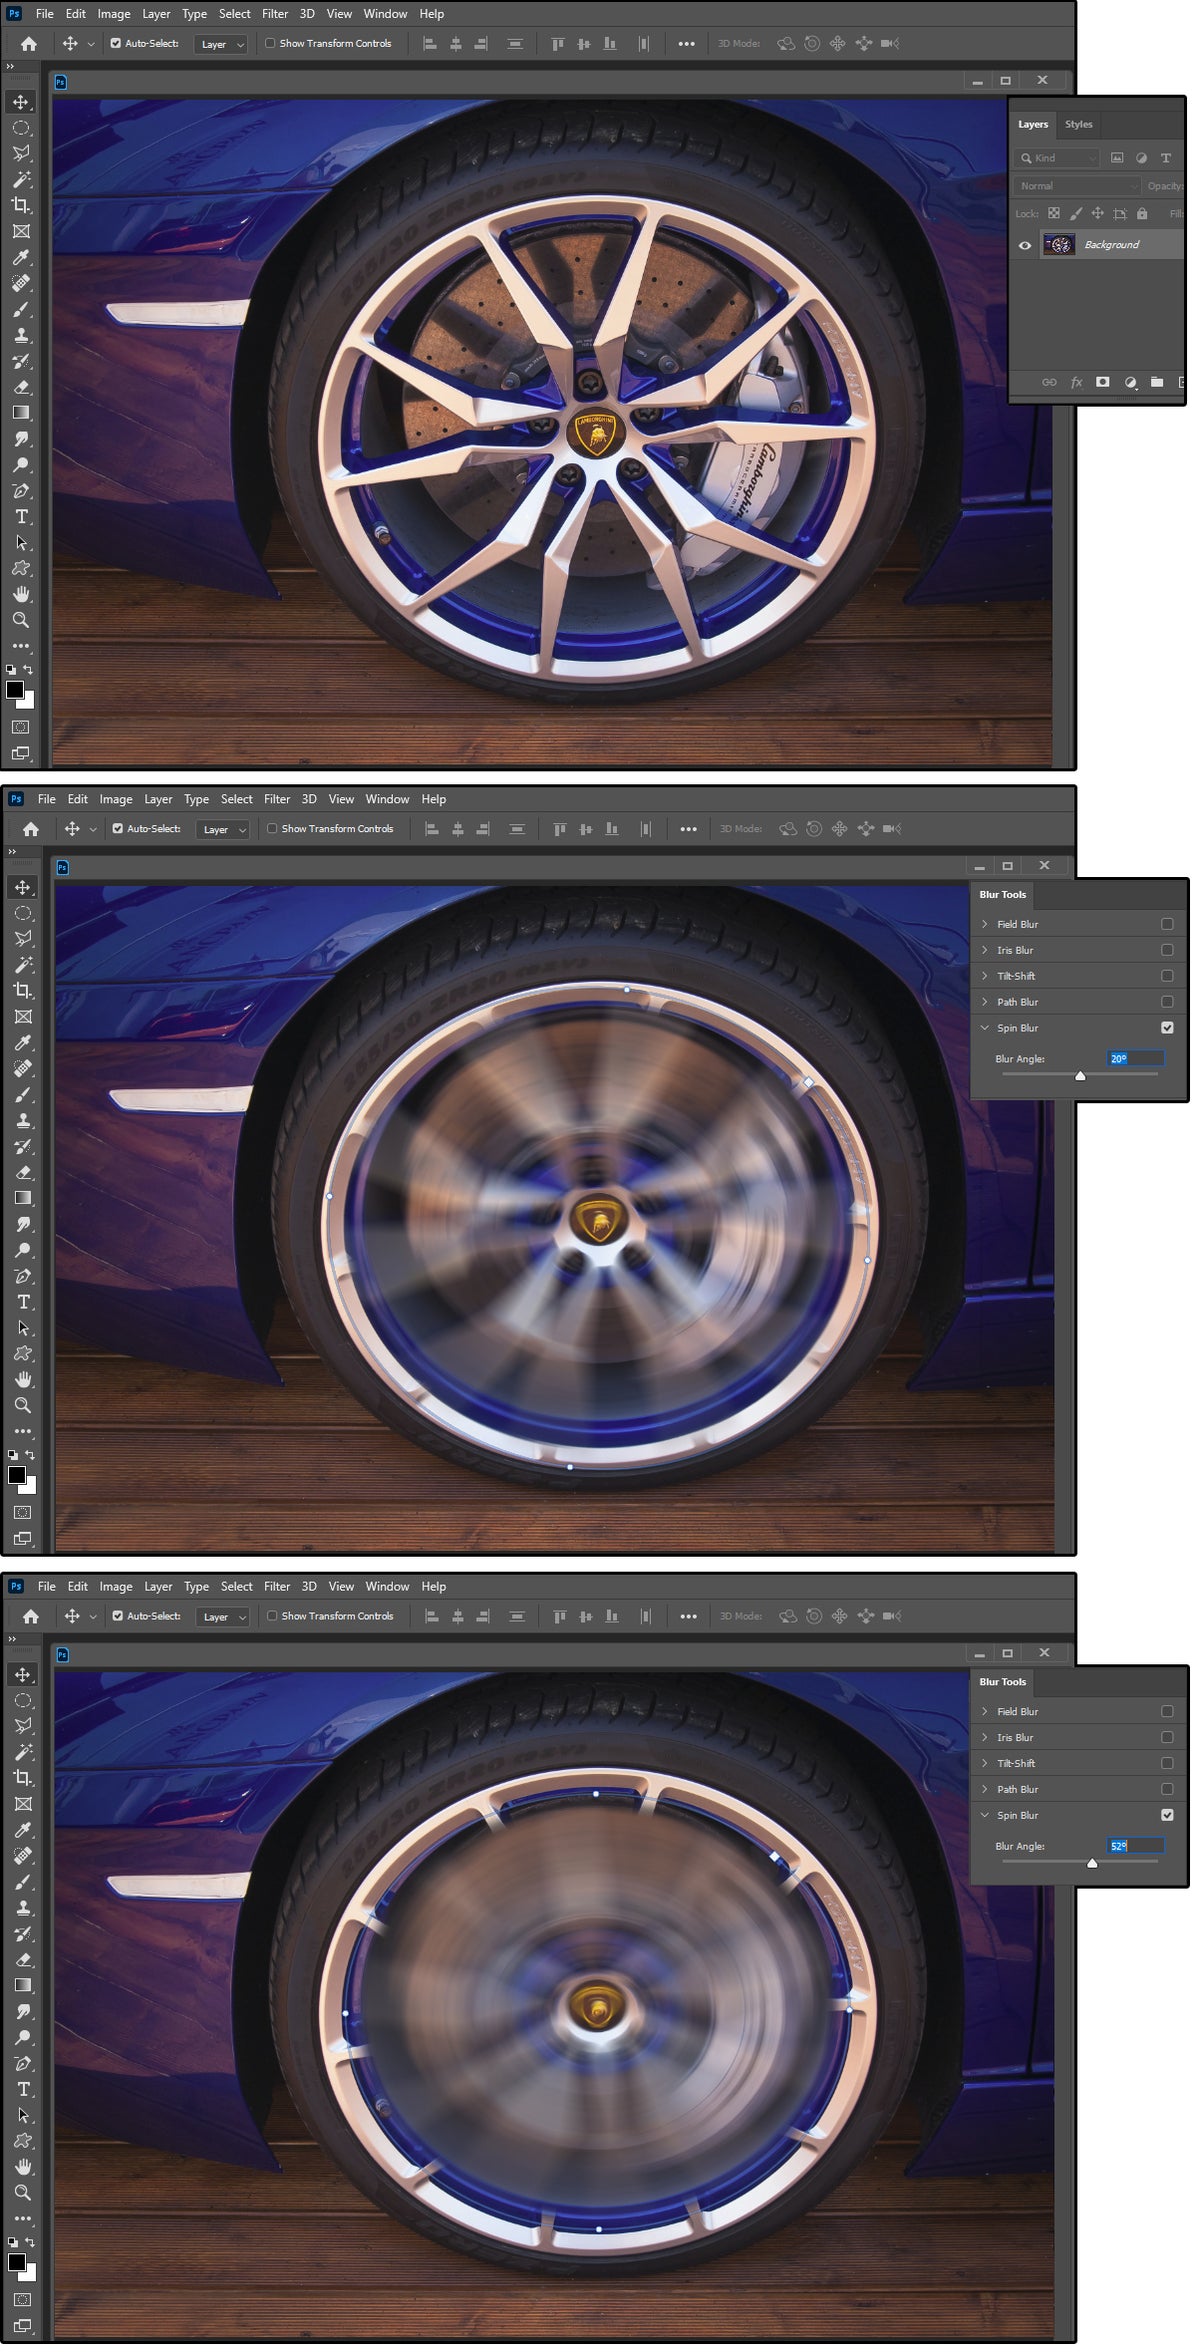 JD Sartain / IDG
Dart Blur is measured in degrees
Exercise the dots to reshape and rotate the outer circle. Exercise the sq. handles to dimension it, and the pinpoint dots to reshape the within, which is the whisper that spins.
We selected to whisk just a few tires. We chosen a Blur Angle of 20 degrees for the first and a Blur Angle of 55 degrees for the second for example the varied angles and the explicit control one has over manipulating the spinning radius.
Gallery Outcomes Tools
Bokeh Outcomes
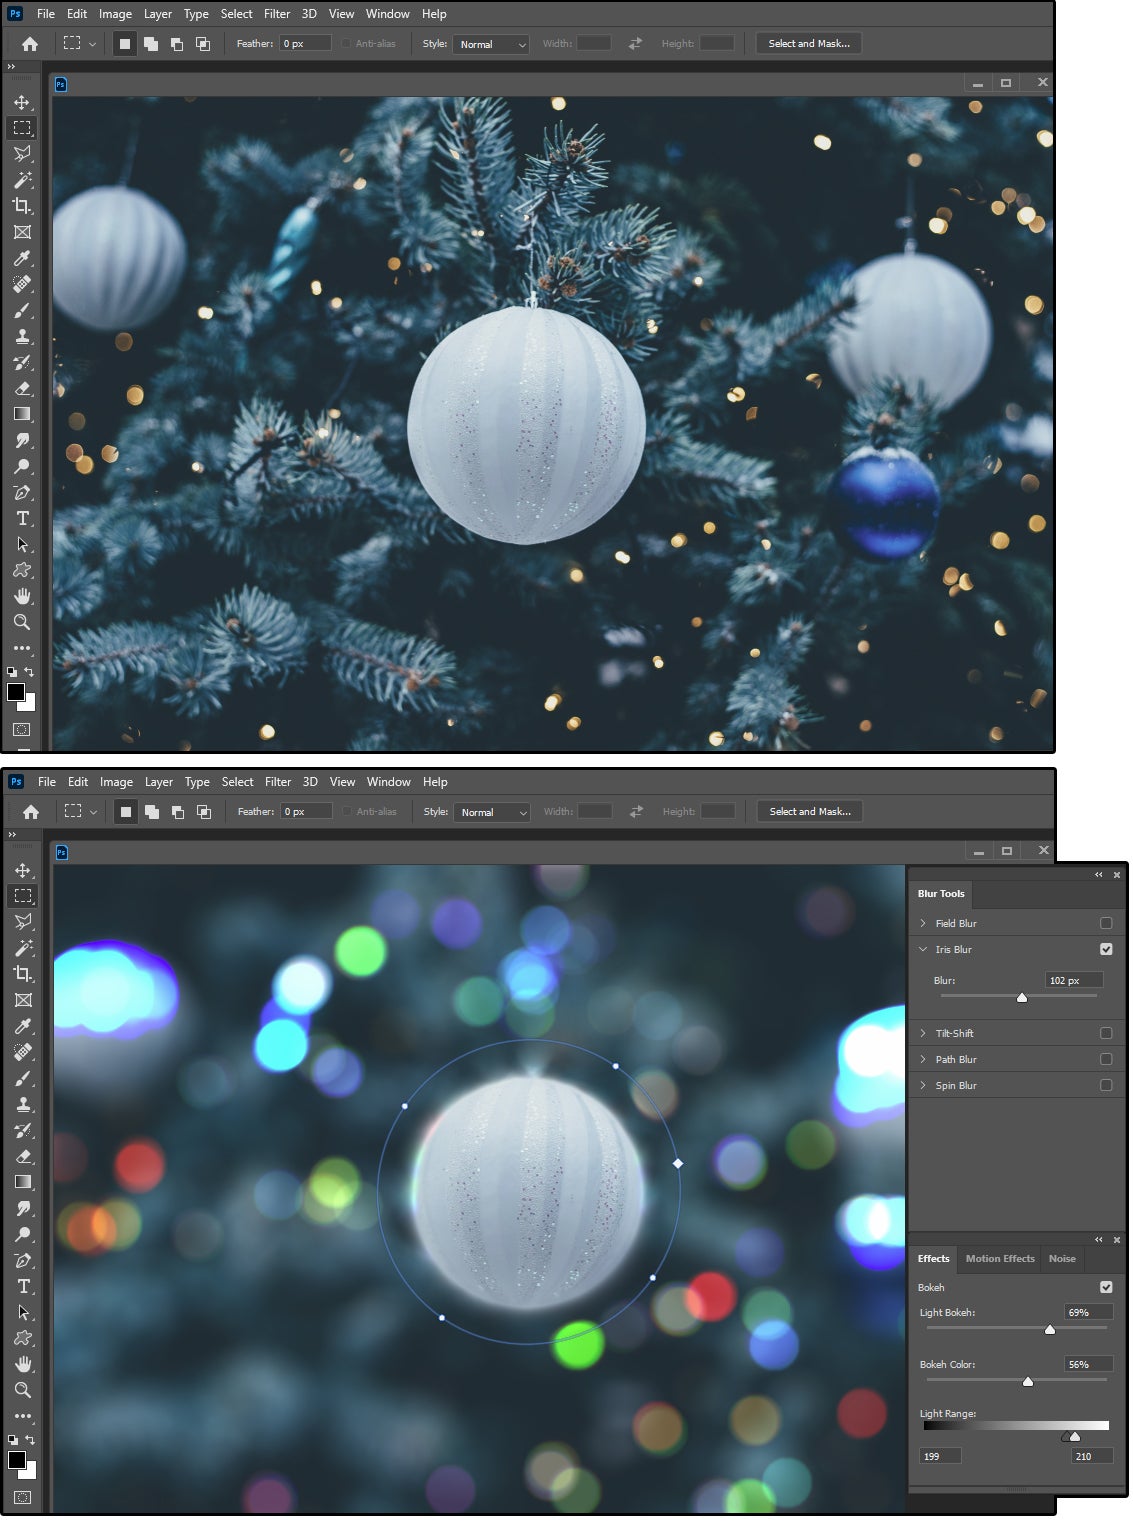 JD Sartain / IDG
Bokeh affects the quality of mirrored mild within the shallow depth of self-discipline
As described within the second paragraph, the Bokeh outcomes in our example method soft, silky circles of sunshine with soft, comely edges.
In finding that the background lights across the ornament in our Christmas photo are gold and white supreme, and appear as confetti-like dots on the tree. After we utilized an Iris Blur of 102 pixels, with 69 percent of Bokeh Gentle, 56 percent of Bokeh coloration, and a Gentle Fluctuate of 210, the ornament now glows on a background of soppy, vivid lights.
Motion Outcomes
These outcomes work supreme on Dart Blur and Course Blur. There wish to be a path or radius of movement to build up Motion Outcomes.
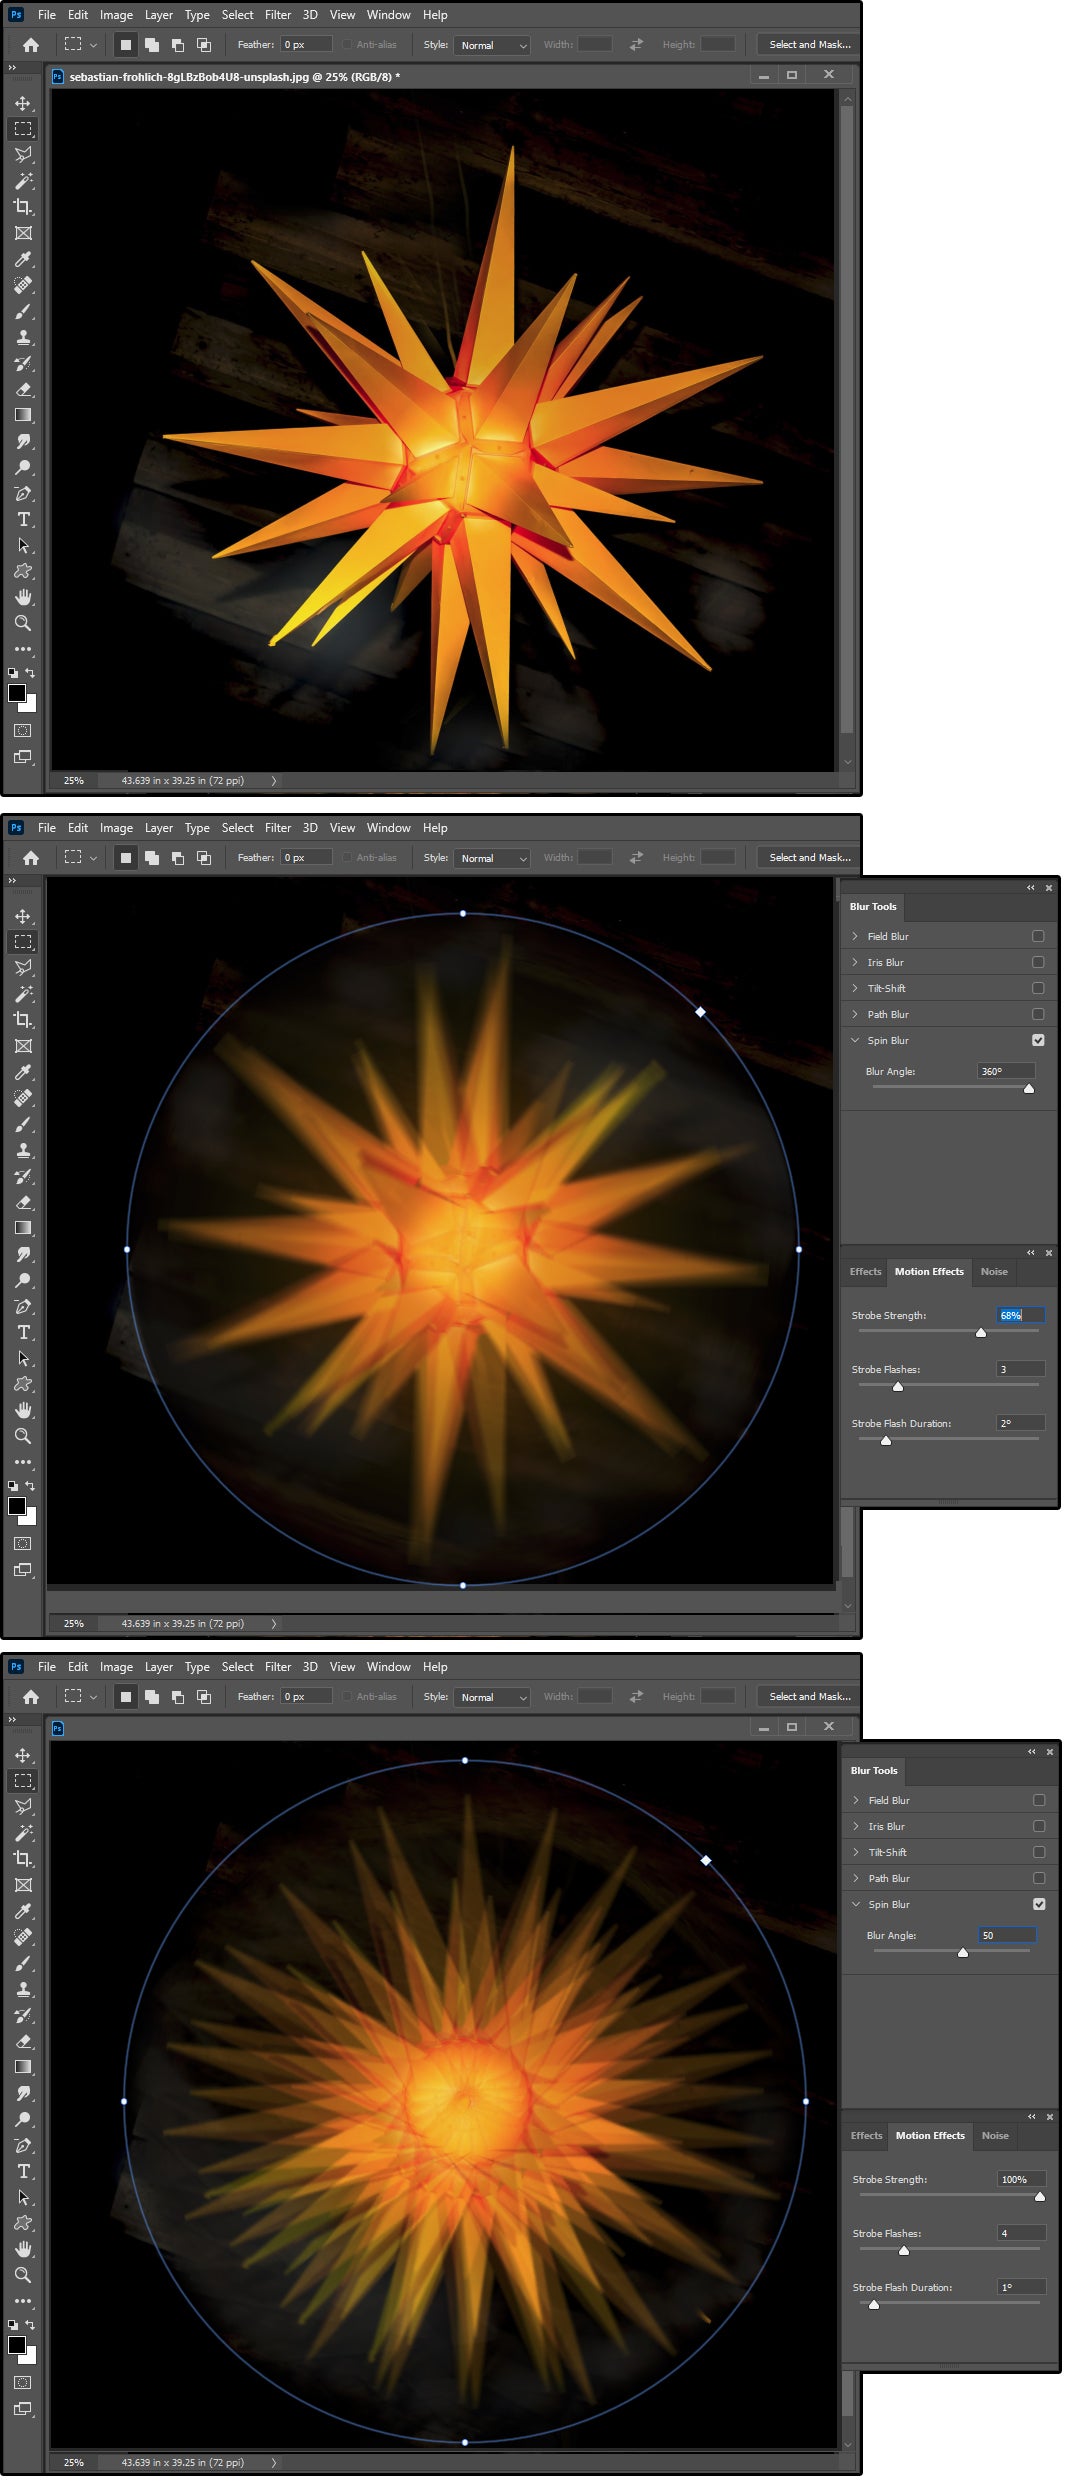 JD Sartain / IDG
Motion Outcomes
The project is understated. Delivery a file, have interaction Filter > Blur Gallery > Course Blur or Filter > Blur Gallery > Dart Blur. Exercise the Pinpoints, the dots, and the handles to dimension and space your path or radius round your object (or across your total image). Purchase a Blur Angle, then spend the Motion aspects to method some unbelievable outcomes.
We extinct a 22-level star to method two very various Motion outcomes.
We started with a Dart Blur. The first one has a Blur Angle of 360 degrees with 68 percent Strobe Strength, three Strobe Flashes, and a Strobe Flash duration of two degrees.
The second image has a Blur Angle of 50 degrees with 100 percent Strobe Strength, four Strobe Flashes, and a Strobe Flash duration of one degree.
Each designs peer unbelievable, but so various. One feels like a flaming star, and the opposite feels like a sunburst. The Motion Outcomes fully switch from one environment to 1 other.
Noise Outcomes
Noise is one other discover for grain, or a grainy live.
 JD Sartain / IDG
Noise Outcomes
You would per chance per chance also add noise wherever for your photos, and there are a selection of methods to achieve it. This live is extinct with the Blur Gallery outcomes so it’s seemingly you’ll perhaps add relieve some detail or texture to a blurred allotment.
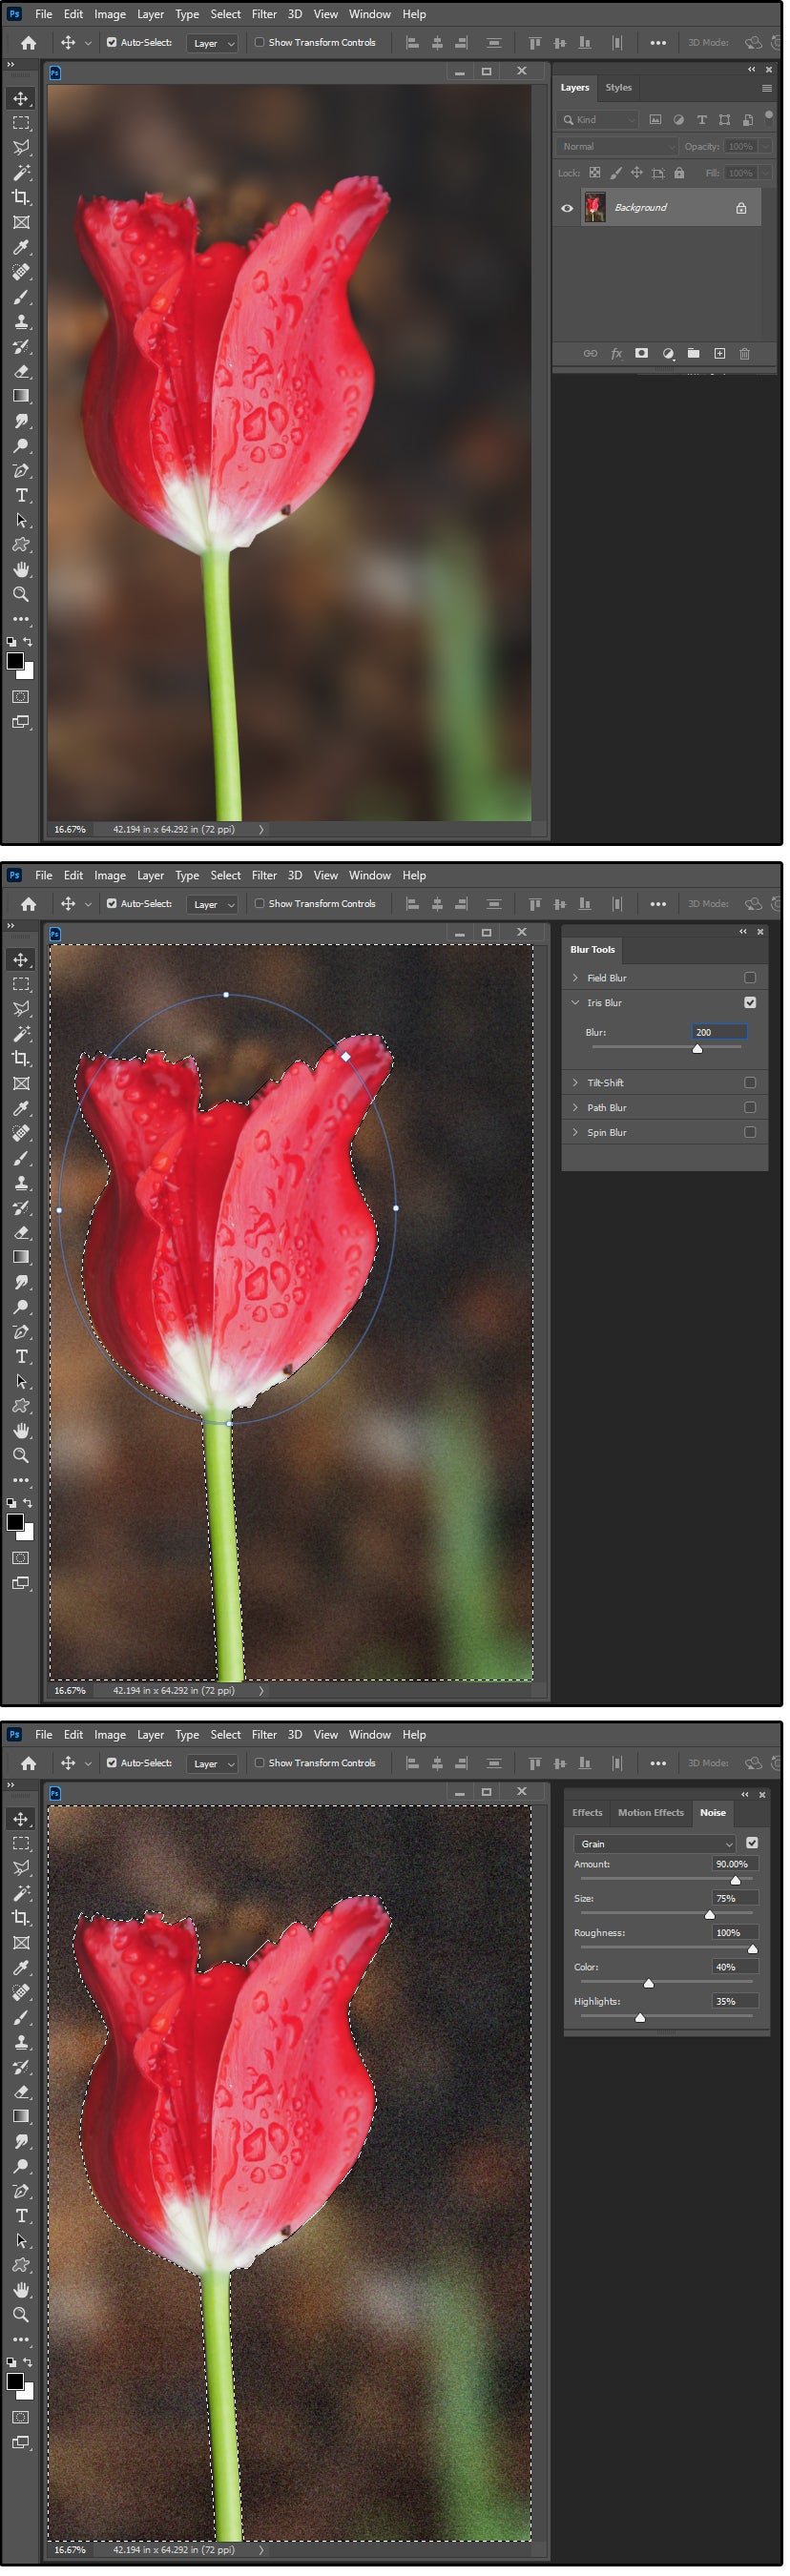
We first extinct the Iris Blur (plight to 200) to mix out the background of a red tulip. There became nothing if truth be told defective with this result, but after about a days of searching at it, we determined to give the image extra depth.
We extinct the Noise Enact within the Blur Gallery to add some wanted texture to the background. We added 90-percent grain at a dimension of 75 percent with 100-percent roughness, 40-percent coloration, and 35-percent highlights. The slow, flat background became transformed to a finely textured set aside.
Demonstrate: Whilst you happen to rob one thing after clicking hyperlinks in our articles, we might perhaps per chance also fabricate a small commission. Learn our affiliate link policy for extra particulars.
JD Sartain is a technology journalist from Boston. She writes the Max Productiveness column for PCWorld, a month-to-month column for CIO, and fashioned purpose articles for Network World.