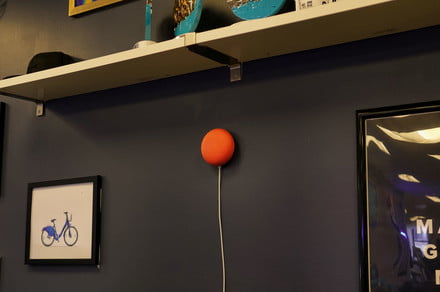
Techniques to wall-mount your Google Nest Mini
Deciding the save to area a dapper speaker is constantly a in actuality most crucial step for your dapper home or area of labor. With the Google Nest Mini and identical puny dapper audio system, Google has added an enticing various — the ability to mount the Mini on a shut-by wall. This risk clears up blueprint and is at risk of be better for listening to music or giving sing commands, depending on the formula you select to own to make employ of it.
Sound adore a honest advice? Right here’s what to get into tale and exactly the ultimate scheme to mount your machine. Whereas this text makes a speciality of the Nest Mini, that you just can moreover quiet technically wall-mount the usual Google Dwelling Mini by adding an attachment.
Step 1: Put up your Mini machine

Before you fear about wall-mounting, it’s good to first flip on and scrape up your Nest Mini. Connect it to the Google Dwelling app and create sure that the entirety is working accurately. Technically, it’s that that you just can moreover imagine to scrape it up after wall mounting, nonetheless you’ll prefer the machine shut at hand one day of scrape up: You would must dangle a handbook reset one day of the setup process, or salvage that your supposed placement is too a long way-off from your Wi-Fi router for upright operation.
Don’t fear must you’re recent to dapper audio system: We own a data on the ultimate scheme to scrape up Nest devices that that you just can salvage essential!
Step 2: Detect the upright area for your wall

It is top to area the speaker in a area that’s accessible, interior easy differ to listen to sing commands, and at the upright role for listening to music, and plenty others. Shoulder height looks to be a odd need, nonetheless grand depends for your atmosphere and the formula you select to own to make employ of the Mini machine. It’s all neatly matched to employ as grand time on this step as an most crucial.
Expend into consideration the Nest Mini and identical audio system must be linked to their cables while in employ, so it’s a honest advice to take dangle of a living the save it’s easy (or much less distracting) to chase a cable to the machine. Strive running the cable from a shut-by outlet to create sure that that this could perchance attain the prevent select to own to dangle the Mini.
If you’ve discovered the suitable living, trace it with a pencil so you are prepared for the subsequent step.
Step 3: Install your screw

Now it’s time to install your screw in the wall — nonetheless no longer honest appropriate any screw will work. Flip over the Nest Mini and stumble on at the puny gap in the aid. This blueprint is particularly designed for mounting the Mini on a wall, and it requires a explicit screw: An #8 Pan Head screw.
Fortunately, these screws are easy to salvage, and there’s a honest chance that you just can own some lying spherical. If no longer, that you just can moreover mercurial characterize a pack adore these. Repeat that these encompass anchors, which that you just can need must you are working with drywall or a identical topic topic. And while some anchors instruct that they are self-drilling, it is your resolution a handheld drill nearby in case that isn’t the case.
If you occur to’re working with wooden as an various of drywall or sheetrock, having an anchor isn’t as most crucial, nonetheless it’s good to quiet be the employ of a sturdy screw. Steer clear of the employ of nails, as they can hurry or vibrate out of role over time.
The scale of the screw is no longer in actuality most crucial, nonetheless that you just can must get a tape measure or ruler for set up. Leave a two-millimeter blueprint between the head of the screw and the wall. This blueprint is barely ample for a machine adore the Nest Mini to relaxation very without problems nonetheless firmly in opposition to the wall with none soundless gaps showing.
Step 4: Mount your mini speaker on the wall

You’ve carried out the total onerous work, so this step must be easy. Line up the blueprint built into the aid of the Nest Mini with the head of the screw, and dangle it in opposition to the wall. Some puny changes is at risk of be an most crucial to salvage it honest appropriate the prevent select to own it.
If you mount the Nest Mini, that you just can moreover chase the cable the prevent select to own it and to the outlet. Hooks, cable guides, and other organizational tools could relief must you select to own to veil the cable below a shelf or windowsill, or at the aid of a desk, and plenty others. Don’t staple or tack the cable, as this could perchance without downside trigger harm.
Step 5: Reverse machine controls if an most crucial

Mounting one thing adore the Nest Mini can create a topic — the LED lights old for machine administration on the unit is at risk of be flipped or awkwardly positioned when compared to when the speaker is resting on a desk. Fortunately, Google draw of this and made a workaround: That that you just can flip the machine controls for your Nest Mini. Fade to your Google Dwelling App, and bewitch your Nest Mini from the machine checklist. Expend out Settings (in overall in the head neatly matched), after which bewitch Reverse Tool Controls. Enable it and think must you love this positioning better.
Editors’ Recommendations
-
Handiest low-value Mac Mini provides for September 2021 -
Handiest low-value Blink camera provides for September 2021 -
Handiest low-value Roku provides for September 2021 -
Handiest low-value projector provides for September 2021 -
The most animated displays for Mac Mini