Tips about how to expose an extinct computer into a Chromebook
No longer easiest will you keep cash, but some older laptops acquire better hardware than low-worth Chromebooks—making this venture a double grasp.
Rob Schultz / IDG
This day’s Simplest Tech Deals
Picked by PCWorld’s Editors
High Deals On Immense Merchandise
Picked by Techconnect’s Editors
Expose Extra
No longer every person needs a pc with a beefy design of bells and whistles. A Chromebook’s simplified interface makes it well liked by faculties—and these of us who assist as IT enhance for less tech-savvy family. You don’t want to disaster about managing irritating updates or fending off malware on a Chromebook, equivalent to you attain whereas you simply install Chrome on an extinct Windows computer, and the lightweight working procedure feels much snappier than Windows on modest hardware. Chromebooks can worth less than a budget PC, too.
You might well well additionally no longer even want to employ something whereas you would additionally simply acquire an older computer already lying about. Inserting within the an identical of Chrome OS onto passe hardware takes less than an hour’s worth of elbow grease, and the last result recurrently feels snappier than at present time’s dust-low-worth Chromebooks.
Right here’s attain it.
Tips about how to remodel a computer into a Chromebook
For this venture, we’ll be the exercise of Neverware’s CloudReady working procedure, which is in step with Chromium OS—the same originate-provide code that Google built Chrome OS on. You might be ready to read extra concerning the fundamental variations between the 2 whereas you’re irregular, but all you would additionally simply acquire to know is that Neverware has made the experience of the exercise of CloudReady all but related to Chrome OS.
Step 1: Test that your computer will meet the necessities
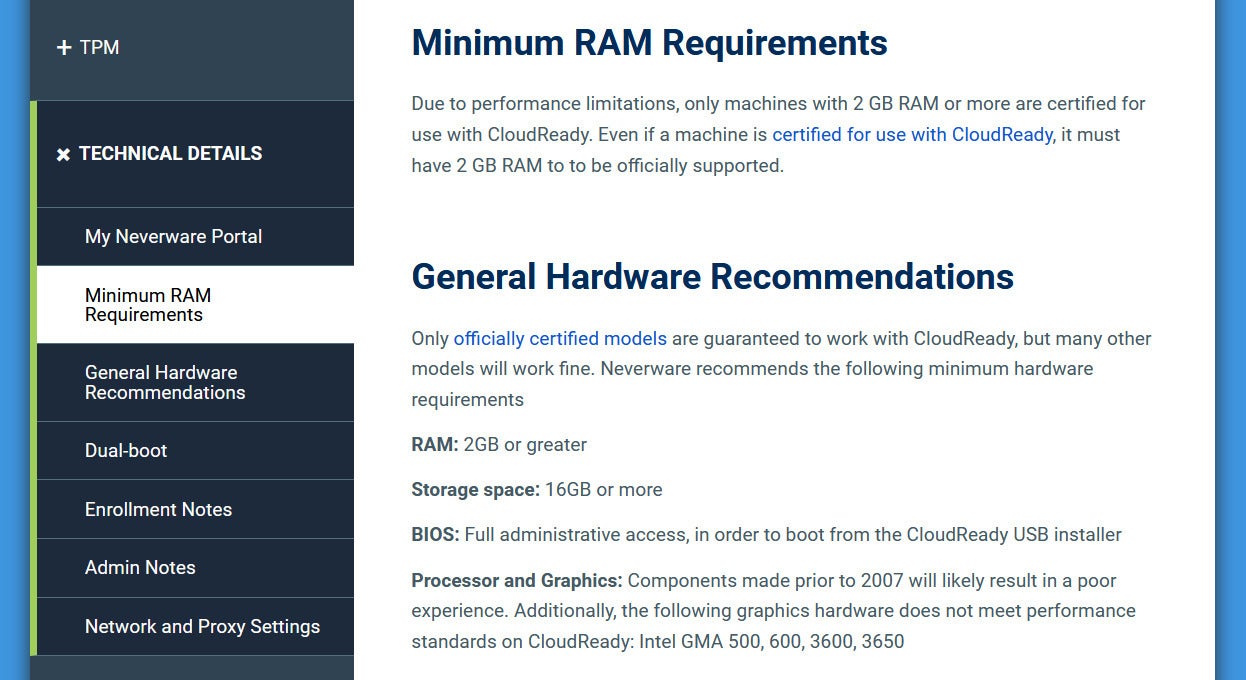 PCWorld
CloudReady’s procedure requirements are very minimal: Handsome 2GB RAM, 16GB storage, beefy BIOS web entry to, and manufactured after 2007.
Fancy Chrome OS, CloudReady’s procedure requirements are very minimal. The computer must acquire 2GB RAM, 16GB storage, beefy BIOS web entry to, and ideally been manufactured after 2007. You can quiet want to test your CPU mannequin, despite the indisputable fact that, as Neverware says that processors with Intel Graphics Media Accelerator (GMA) 500, 600, 3600, or 3650 graphics hardware don’t meet CloudReady’s efficiency requirements. (In other words, Atom processors from the Silverthorne, Lincroft, and Cedarview households, that acquire been stumbled on in low-halt laptops between 2008 and early 2012.)
Your easiest-case scenario is to search out your computer on Neverware’s checklist of certified devices, which clearly outlines enhance for elements fancy a webcam or touchscreen. (Click on on the mannequin’s name to gaze these little print.) We lucked out that our test mannequin, a 2013 Lenovo ThinkPad X240, had beefy feature enhance across the board.
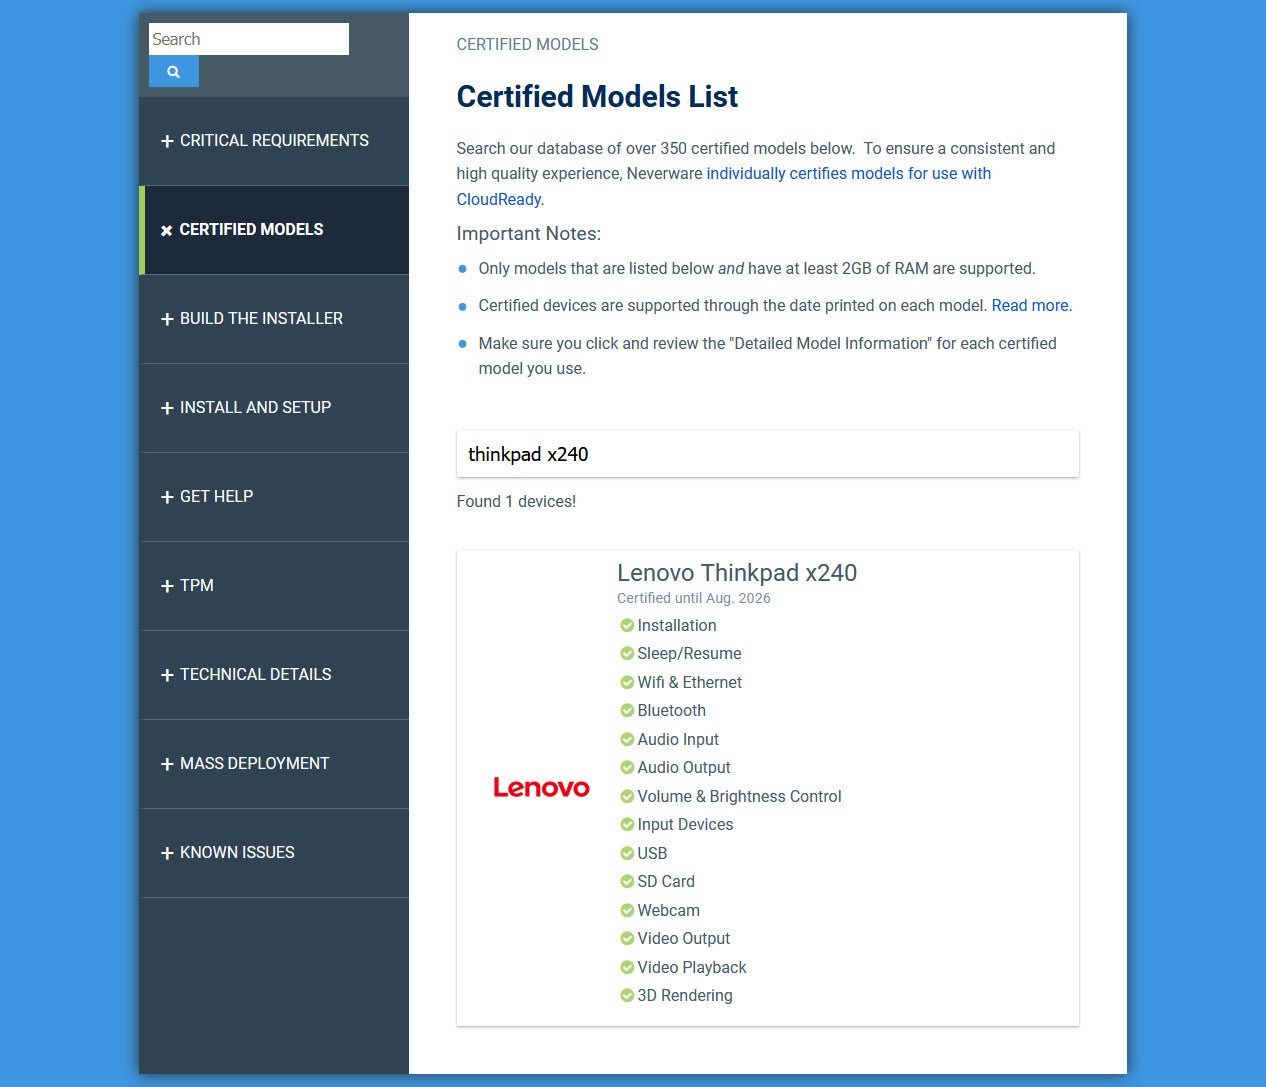 PCWorld
We lucked out with our test machine, a Lenovo ThinkPad X240: All of its predominant elements are supported.
Show: On the compatibility checklist, you’ll gaze desktop methods fancy iMacs and NUCs listed moreover—so whereas you would additionally simply acquire a spare display screen, mouse, and keyboard, you would additionally as a replace roam up a Chromebox. Programs working integrated graphics work easiest.
In case your computer meets the hardware requirements but isn’t on the certified devices checklist, don’t disaster. You might be ready to are attempting out CloudReady from the flash force you’ll create subsequent, which is ready to enable you test out how well it without a doubt works and not using a ought to nuke your procedure.
FRIENDLY REMINDER: Sooner than you launch installing CloudReady, abet up any files inside your existing OS! The strategy is expounded to a neat install of Windows, Linux, or MacOS and can acquire to quiet fully wipe your force.
Step 2: Prepare the flash force for installation
To put in CloudReady, you’ll want an 8GB USB force (at minimum) and a PC, Mac, or Chromebook to create the installation media. The strategy takes about 20 minutes.
We’ll be the exercise of CloudReady Home edition, which is free and can acquire to quiet work even whereas you intend to exercise this Chromebook for school. You might be ready to ignore any notes or warnings about restrictions related to management licenses—they’re for the CloudReady Project and Education versions, which could maybe be bought by an institution.
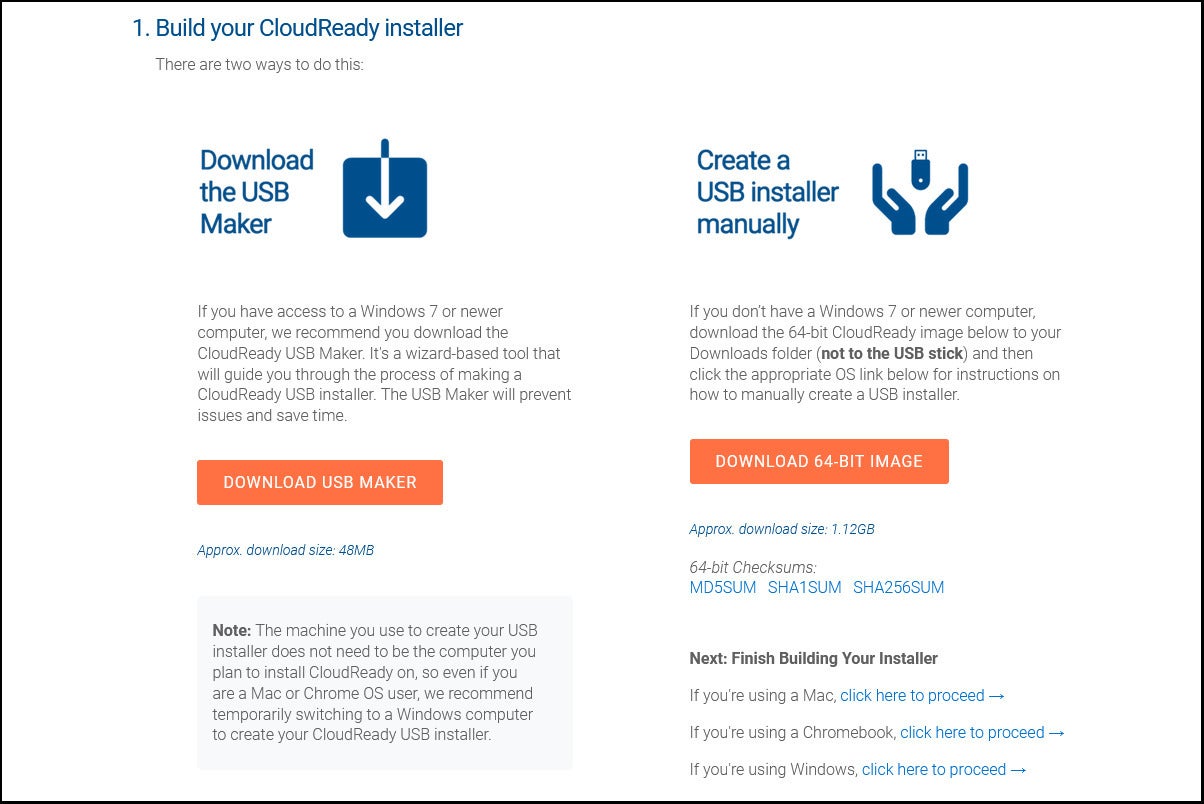 PCWorld
The most involving advance to put together a CloudReady installation flash force is with a Windows PC.
The usage of a Windows PC to create the flash force installer is most sensible, as you would additionally acquire the USB Maker and let it lift care of the total process. For Macs, Linux PCs, and Chromebooks, you’ll want to acquire the CloudReady Home Edition image first, then phrase Neverware’s instructions for manually constructing your installer.
Step 3: Boot to flash force
In report along with your newly created flash force, you would additionally simply acquire to avoid your computer’s computerized boot report, which generally defaults to the main storage force. You’ll attain this by hitting a key to your keyboard when your PC first powers up, equivalent to entering the BIOS. Search online for the advance to web entry to the boot priority menu for your teach computer, because it’s no longer current. For instance, our Lenovo ThinkPad X240 required mashing F12 honest at startup, whereas for our HP Spectre x360, it changed into F9. CloudReady even provides a checklist of boot keys for predominant computer makers.
An different design is to enter your computer’s BIOS (another time, you should well want to scrutinize which key to press when powering to your computer) and rearrange the automatic boot report, then undo that substitute after your CloudReady install.
In either case, you would additionally simply acquire in mutter to make a decision the USB force as your boot tool. A white display mask mask with the CloudReady emblem will appear rapidly thereafter.
Tip: Did you halt as much as your computer’s default working procedure after booting, regardless of repeated button mashing? You likely waited too long to delivery out pressing the predominant, otherwise you aren’t pressing the honest combination of keys. (Example: Plan keys could well additionally simply require also preserving the Fn key—or no longer.)
Step 4: Set up CloudReady
When the welcome display mask mask looks, you would additionally lift one of two routes: Directly wipe your computer’s force and install CloudReady, or configure CloudReady on the flash force. Lift the latter whereas you’d exhaust to test force CloudReady for transient whereas—doing so permits you to are attempting out Neverware’s OS with none damaging changes to your procedure.
Show: Neverware would no longer counsel working CloudReady indefinitely from a USB force attributable to efficiency and storage boundaries, along with a lack of OS updates.
Option 1: Set up
After booting to the flash force, await the welcome display mask mask to appear, then click on the bottom honest-hand allotment of the display mask mask where the time reveals. Within the menu that looks, make a selection Set up OS.
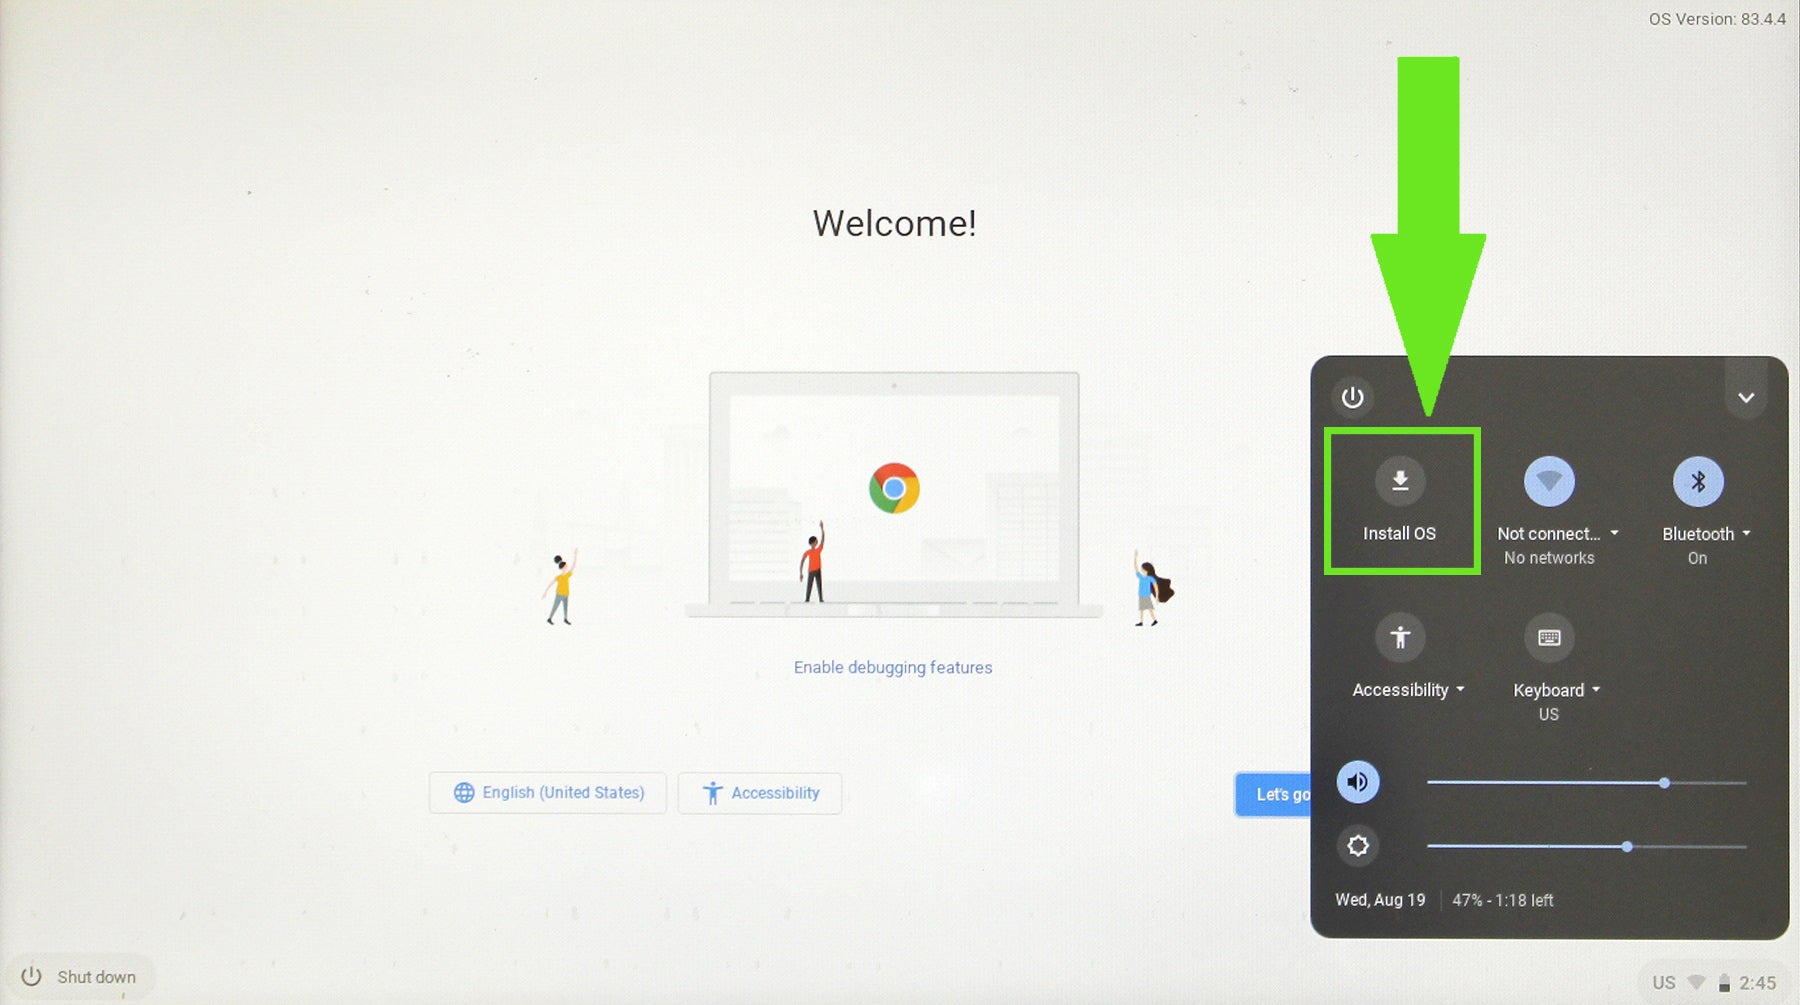 PCWorld
You’ll get the option for installing CloudReady to your computer inside this menu.
Ascertain you’ve backed up your records, after which proceed with the exhausting force wipe and CloudReady installation. Neverware says the strategy will last between 5 and 20 minutes, searching on the flee of your flash force and the dimensions of your computer’s exhausting force.
Upon completion, your computer will shut down. Expend away the USB force, then energy the procedure abet on (and undo any changes to your BIOS’s computerized boot report, if appropriate). You’ll gaze a welcome display mask mask as soon as extra, now working from your computer. Click on on Let’s Scuttle to launch setup.
Option 2: Attempt out CloudReady from the flash force
When the welcome display mask mask looks, click on Let’s Scuttle to delivery out setup. After passing by strategy of configuration screens for Wi-Fi, records sharing, and Google story login, you’ll reach the desktop. Shut out of the pop-up window that reveals files on the paid editions and as much as the moment liberate notes to launch the exercise of CloudReady.
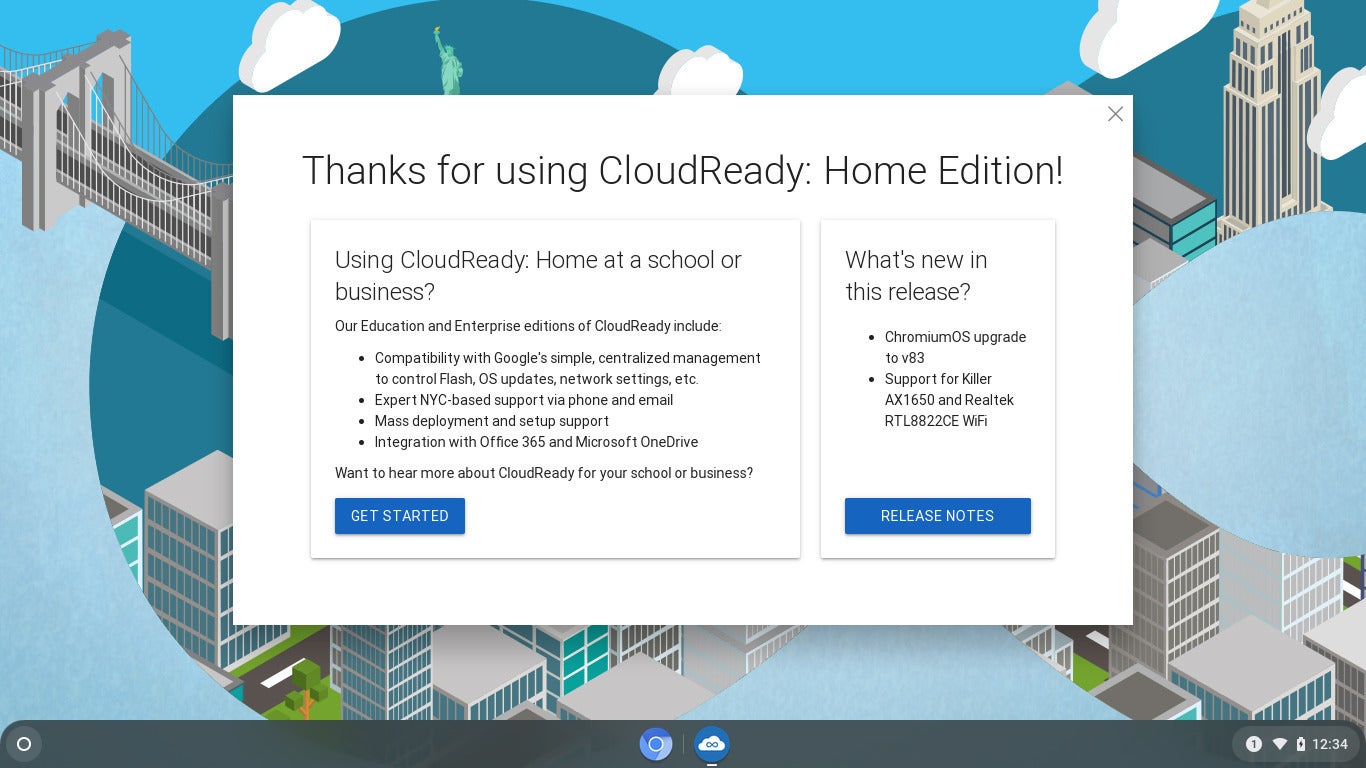 PCWorld
Except you should well well like to read the liberate notes, you would additionally shut out of this desktop delivery display mask mask honest away.
You might be ready to later install CloudReady within the community by clicking on the time within the bottom honest-hand allotment of the display mask mask. Lift Set up OS within the menu that looks. After completion, your computer will shut down. Expend away the USB force, then energy the procedure abet on (and undo any changes to your BIOS’s computerized boot report, if appropriate). You’ll gaze the welcome display mask mask as soon as extra, now working from your computer; launch setup by clicking on Let’s Scuttle.
Step 5: Permit Proprietary Media Parts
In report for CloudReady to scheme ideally suited fancy Chrome OS, you’ll want to lift one extra step. Paid video streaming services and products that count on DRM protection (fancy Netflix and Hulu) won’t work unless you enable a design of proprietary media plugins. It’s essentially the most productive factor that doesn’t work honest out of the box.
 PCWorld
Assign a ways flung from working into Netflix’s M7361-1254 error by enabling Chromium’s Proprietary Media Parts.
Safe admission to the procedure settings by typing chrome://os-settings into a Chromium browser window. (You might be ready to also click on the time within the bottom honest of the display mask mask, after which on the gear icon.) Lift Media Plugins, then install Proprietary Media Parts.
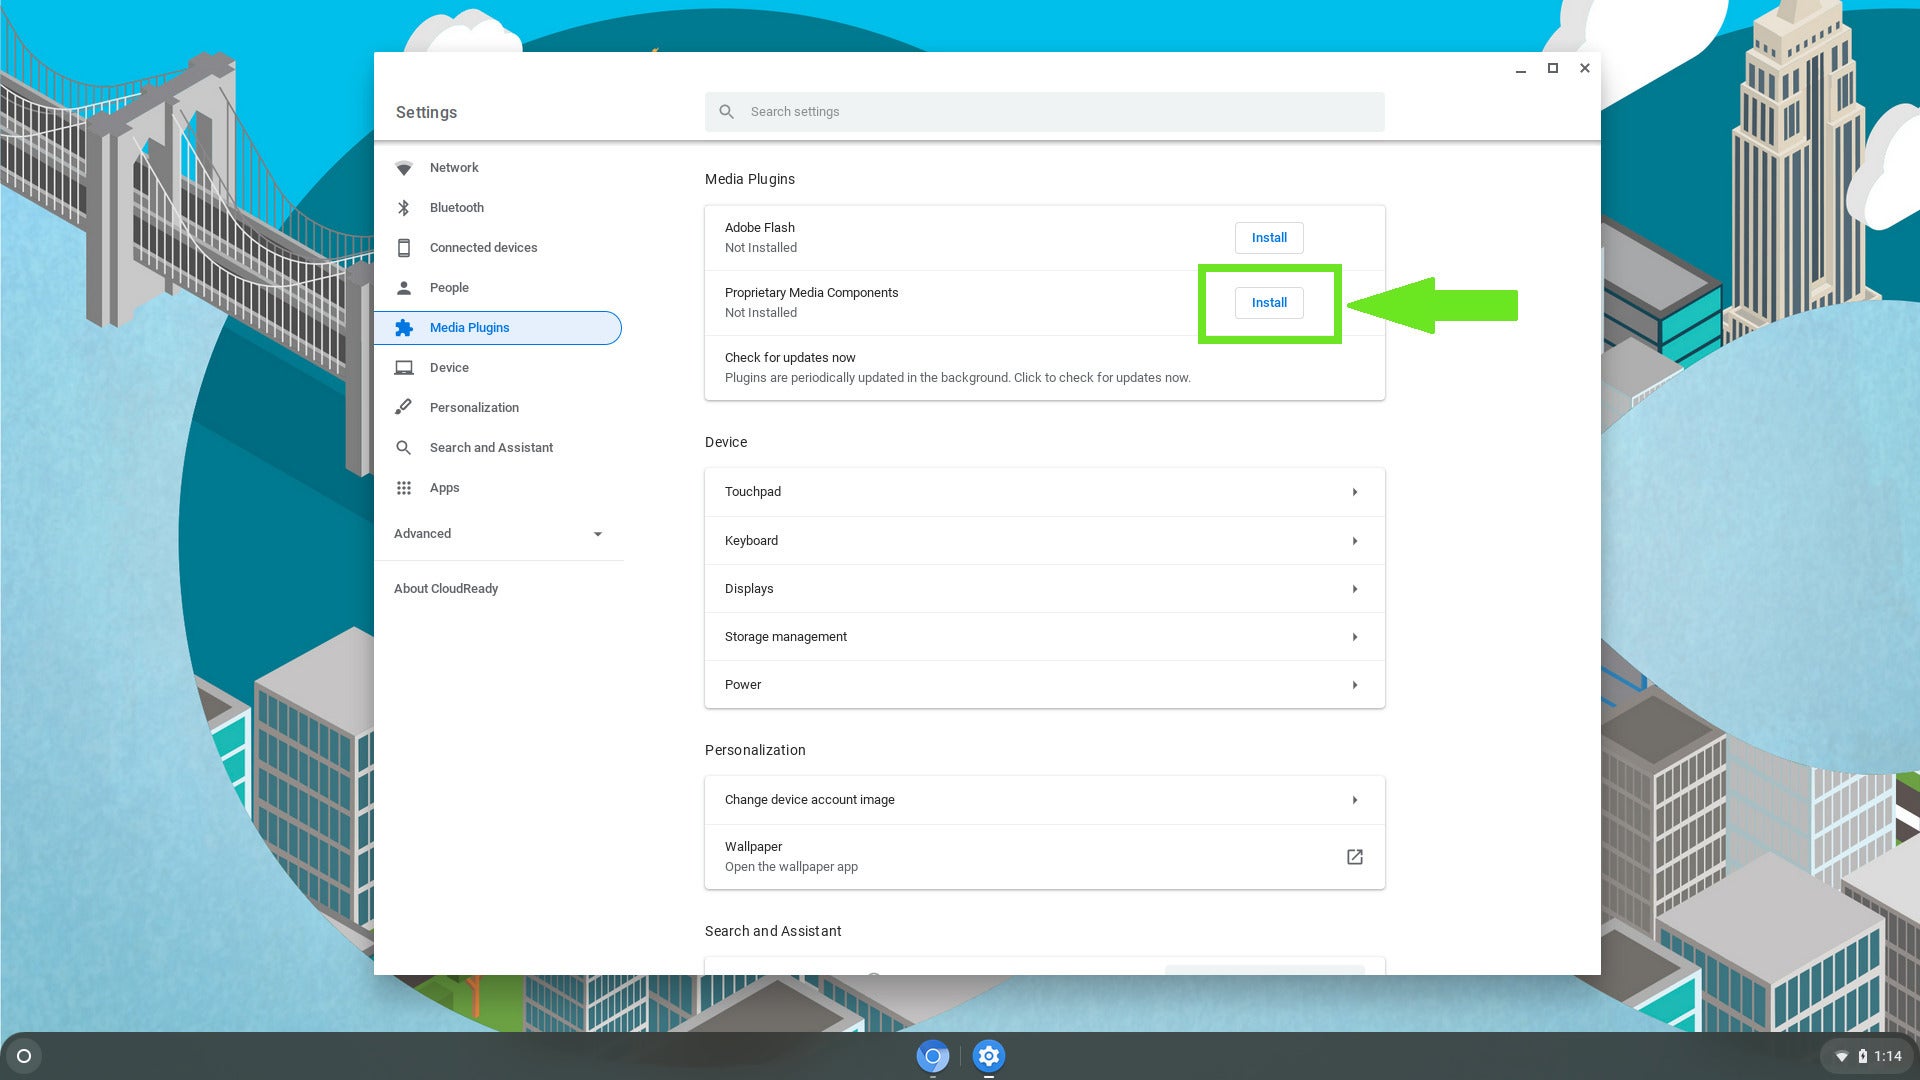 PCWorld
Unlike Chrome OS, you would additionally simply acquire to lift one extra step to create both DRM-stable streaming video and Adobe Flash work in CloudReady.
You might be ready to also make a selection to put in Adobe Flash now, too, despite the indisputable fact that this could occasionally quiet remain off by default. You’ll want to achieve enabling Flash later on by opening Chromium and navigating to Settings > Situation Settings > Flash, then clicking the toggle subsequent to Block web sites from working Flash. That can substitute the environment to Assign a quiz to first, allowing you to urged Flash on a case-by-case basis.
How well does it flee?
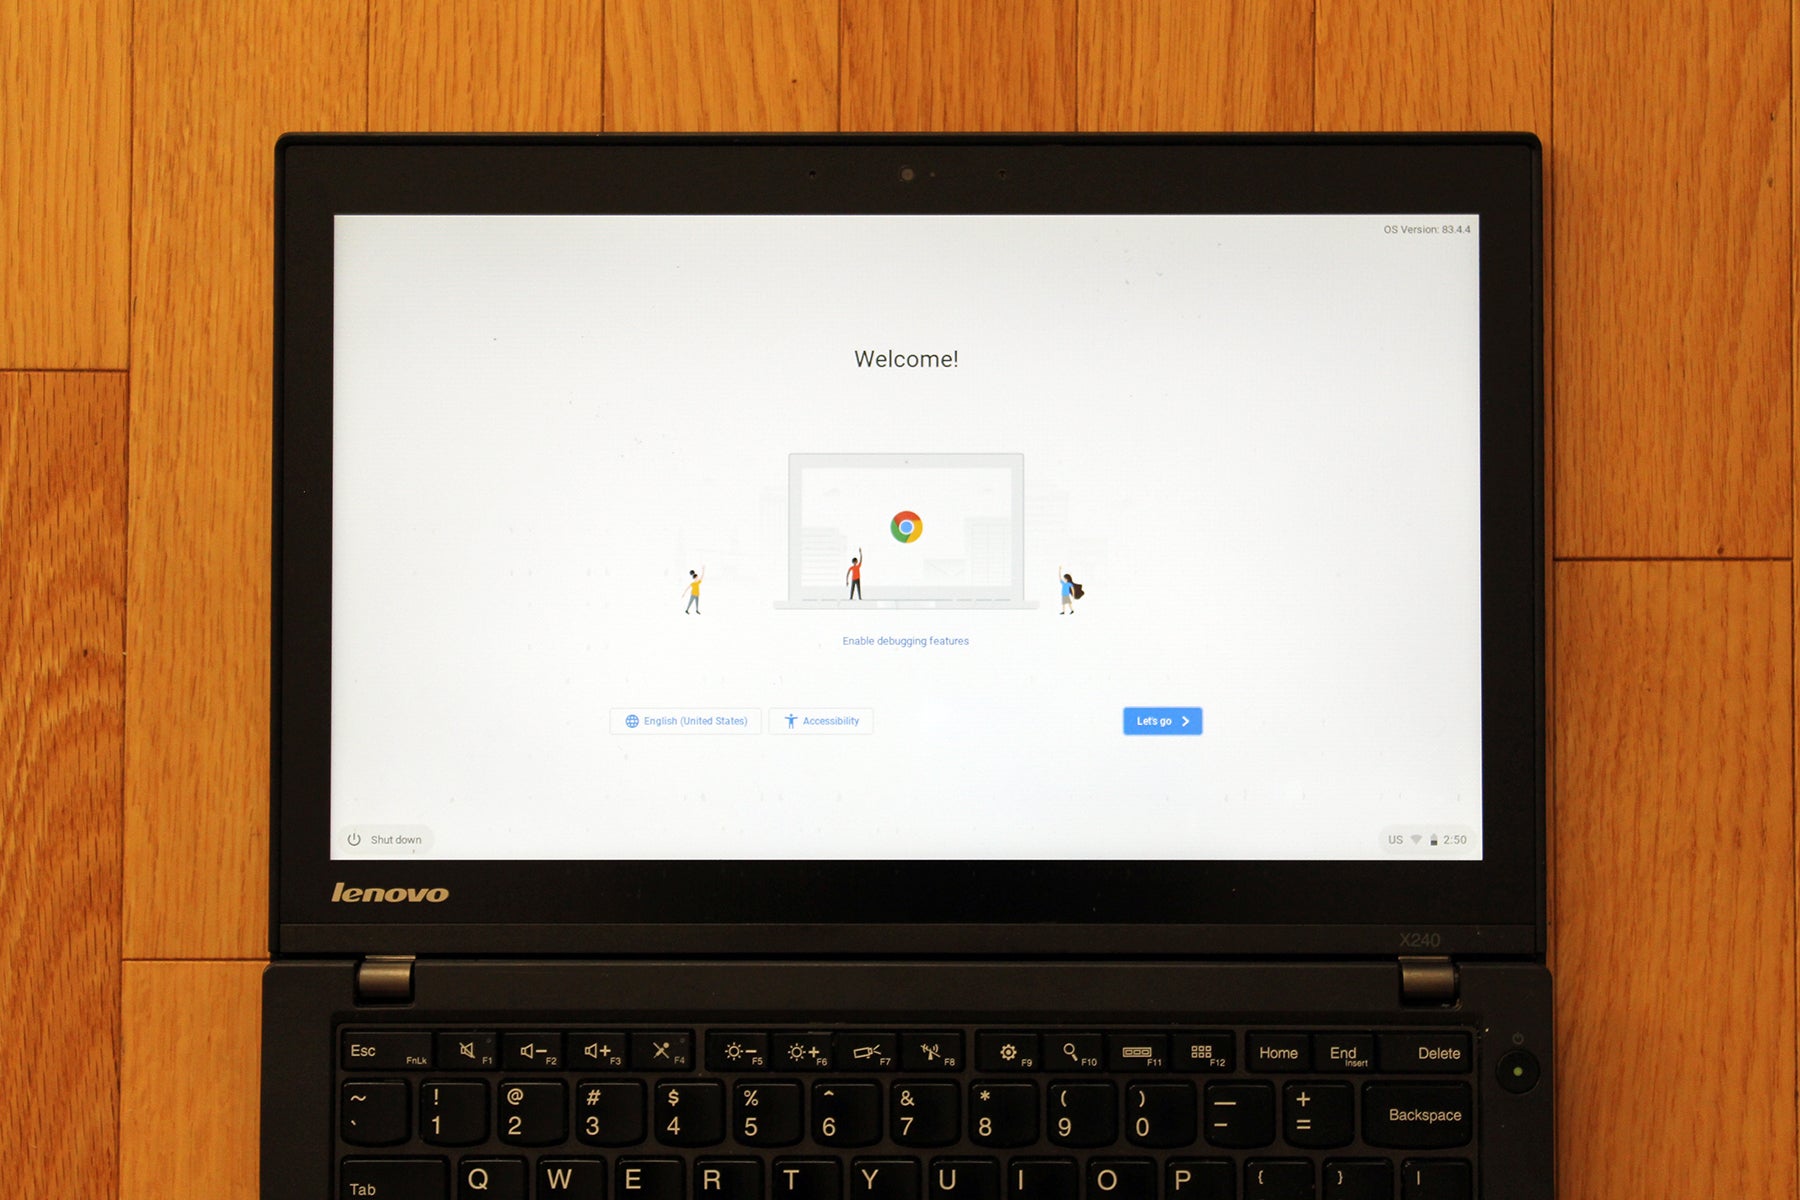 Alaina Yee / IDG
As a Windows PC, our Lenovo ThinkPad X240 changed into initiating to web long within the tooth. As a Chromebook, its hardware automatically made for a peaceful, satisfying experience.
For this article, we archaic a 2013 Lenovo ThinkPad X240, borrowed from our IT department’s stash of decommissioned laptops. This 12.5-race touchscreen computer is long within the tooth by at present time’s requirements, mainly attributable to a spinning-platter exhausting disk force—when working inside Windows 8.1, I could well additionally without a doubt feel delays in response in some unspecified time in the future of mundane exercise.
Nonetheless our X240’s Intel Core i5-4300U processor, 8GB RAM, and 500GB force fully crushes at present time’s budget Chromebooks. It hangs gorgeous well with mid-differ items, too, regardless of its 1366×768 resolution display mask. After we tried CloudReady off the flash force, the touchscreen worked straight away and the procedure ran buttery peaceful; even when put in on the exhausting disk force, CloudReady had a much quicker response time than Windows 8.1. Occasionally I’d swap in an SSD on a semi-older computer to elongate its lifestyles, but I stumbled on I could well additionally exercise CloudReady on the X240’s existing hardware without craving for that upgrade.
Standby battery lifestyles also improved, allowing us to head from a day of exercise between costs in Lift 8.1 to a number of days in CloudReady.
Within the event you don’t acquire an extinct computer
Attempt hunting for gently archaic notebooks amongst reliable pals or family. Native universities typically also acquire surplus departments, which offload older pc gear by selling it to the public. Once in a whereas, you would additionally get appropriate refurbished computers by strategy of Amazon Warehouse or Woot, too.
Supreme methods
- In case your older computer has low-halt hardware (or very extinct hardware) paired with a exhausting-disk force, you’ll enhance efficiency by swapping in an SSD. Be obvious to search out out the height of your existing exhausting force earlier than procuring for, so that it’ll fit the gap.
- Though CloudReady capabilities all but related to Chrome OS, one little disagreement is that the keyboard layouts don’t match exactly. Most keyboard commands carry over, but a number of are moderately of assorted (fancy taking a screenshot). Our Lenovo ThinkPad X240 didn’t even match Neverware’s recommendation of CTRL + F5 for a web tell refresh; for some inexplicable motive, CTRL + F11 worked as a replace. You might well well additionally simply also want to experiment to search out the honest key combos.
Show: Whereas you acquire something after clicking hyperlinks in our articles, we could well additionally simply execute a little commission. Read our affiliate hyperlink policy for additional little print.